Find answers to the frequently asked questions
How to start using Trackr?
You can start using Trackr service in a few quick and easy steps:
- Install Trackr application.
- Choose a payment plan that best suits your business needs.
- Add tracking page to your shop's menu. Please find more info here.
- Assign tracking code to an order and fulfill it. Find more info here.
- Then the tracking number is registered in the tracking system and starts providing shipment information received from a carrier on your tracking page.
- Find shipment info in the Shipments section in the Trackr Admin.
Customers can search for tracking info on your tracking page using Tracking number or Customers email/Phone + Order ID combination.
Please find more information about Trackr here.
How to add Trackr page to your store menu
You can add a branded tracking page to your store in a few quick steps:
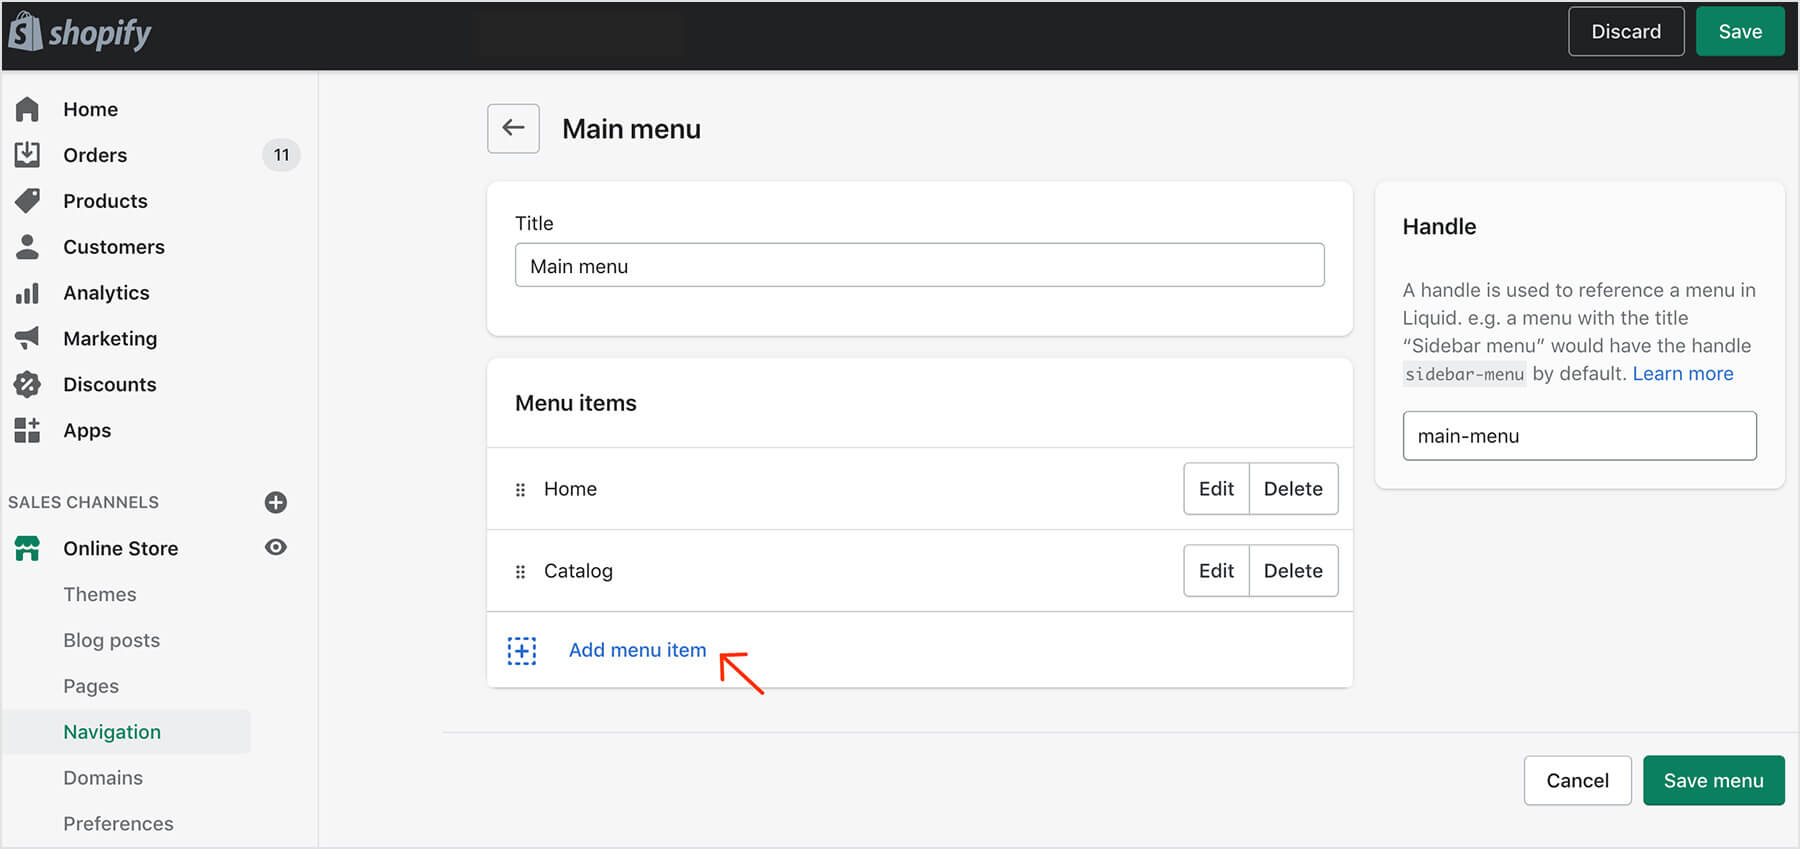
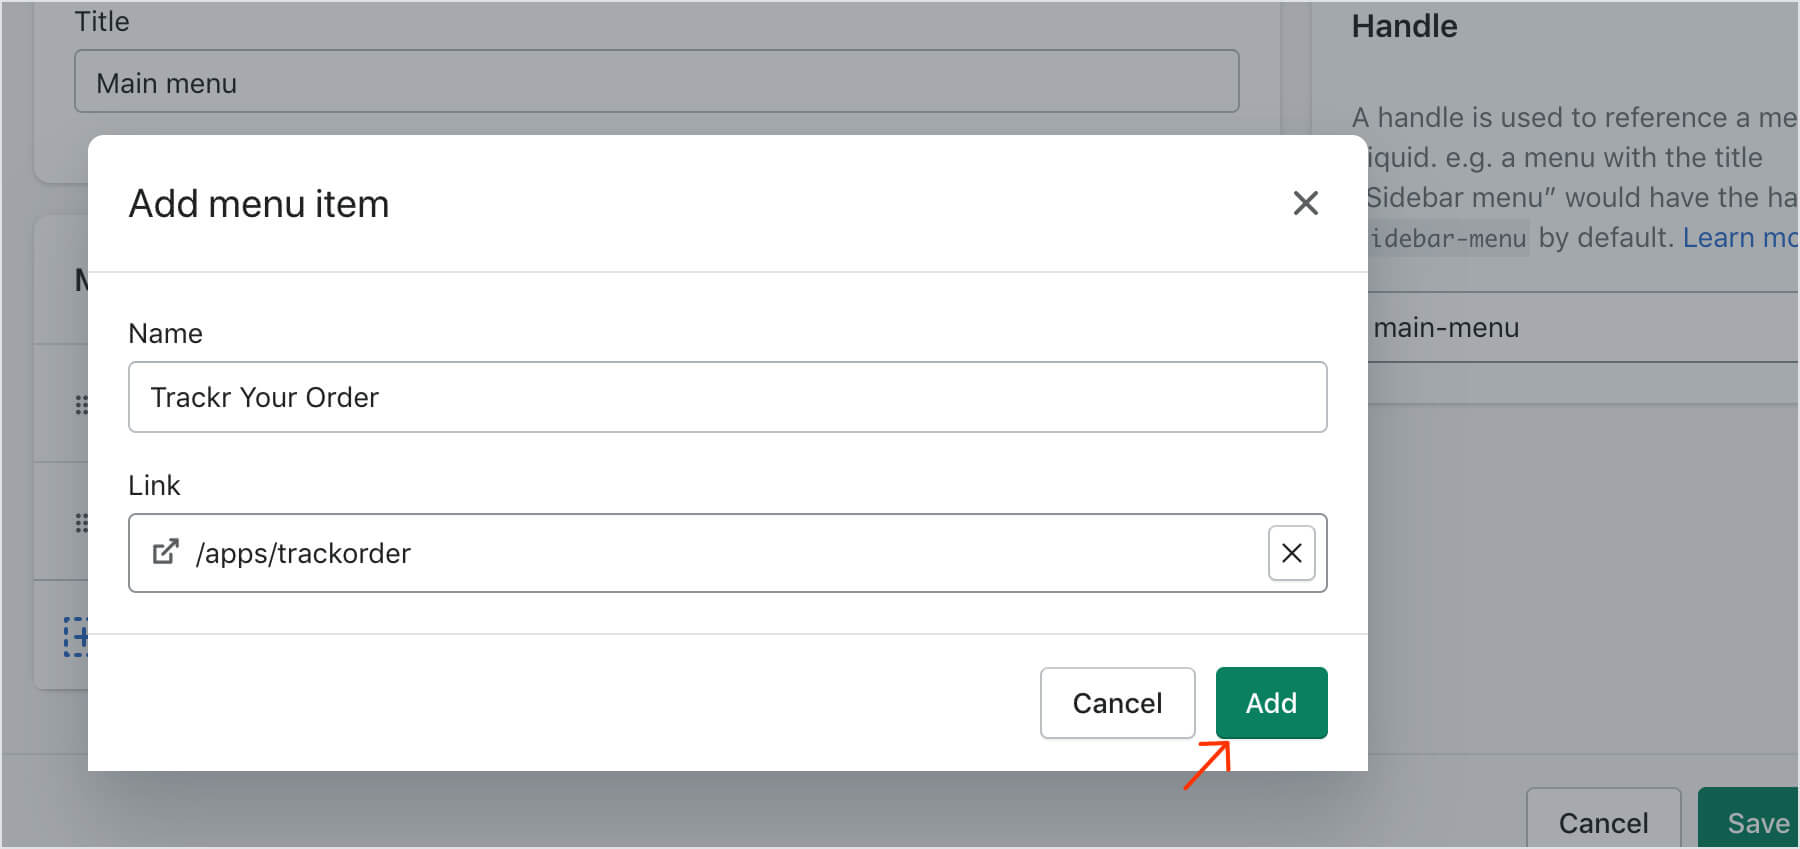
Please follow these steps to link Trackr with your store menu:
- Navigate from Shopify admin => Online Store => Navigation section (or simply click Add Menu Item button on Trackr app preferences page)
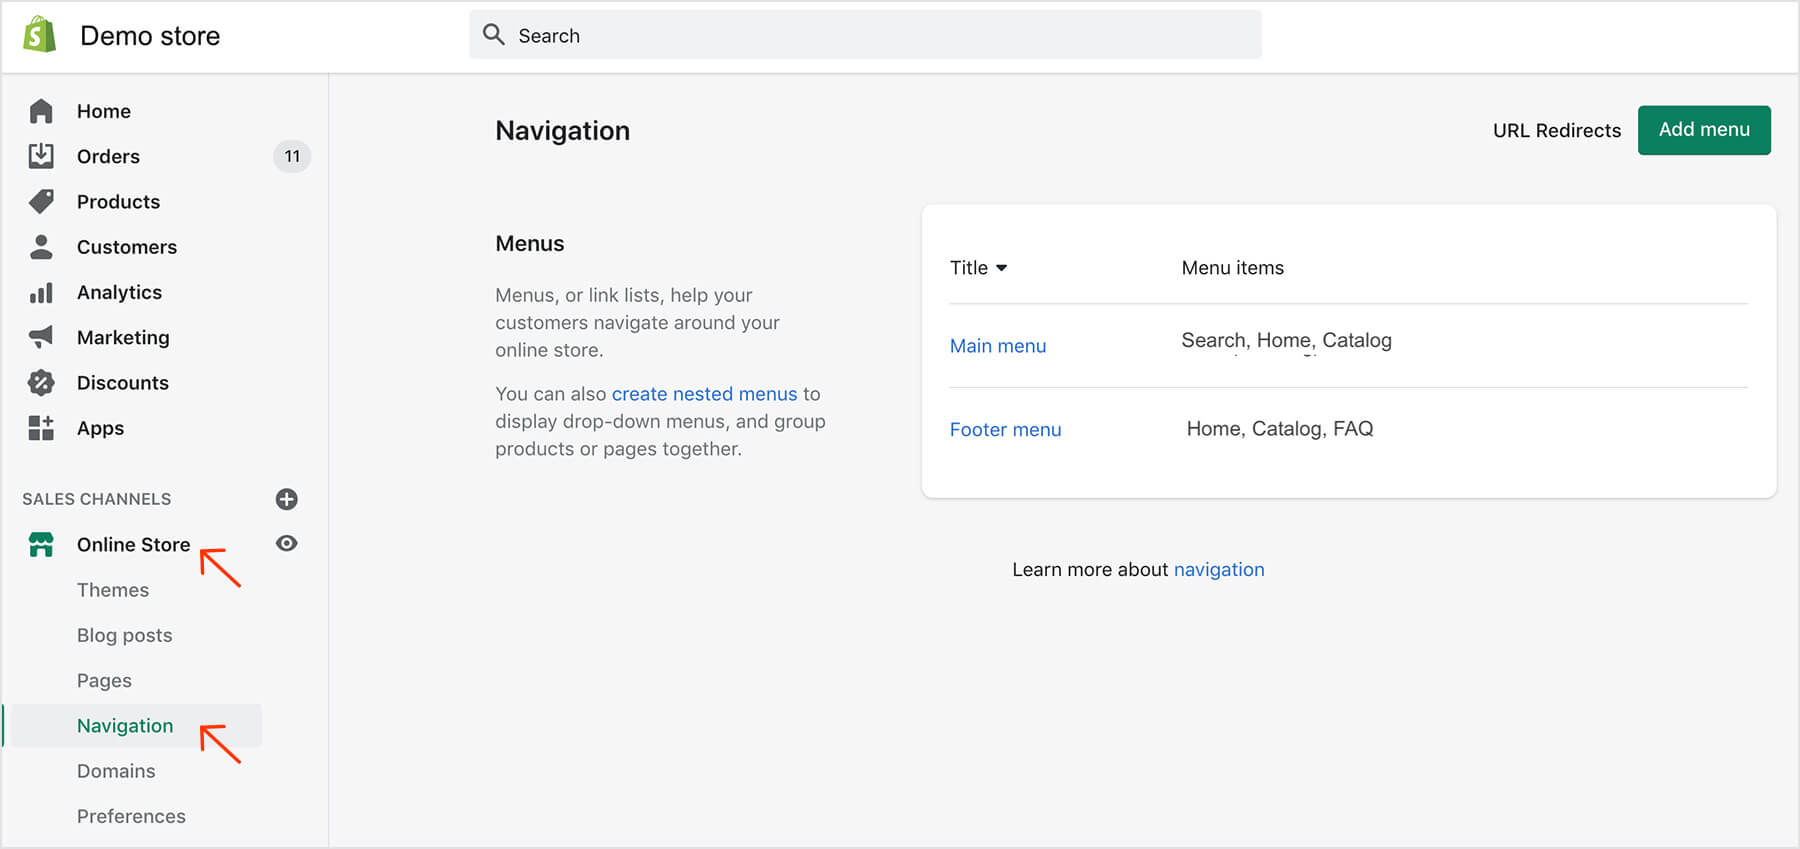
- Select a menu (Main menu, Footer menu or Add menu) that you wish to add the Trackr page to
- Click Add menu Item link
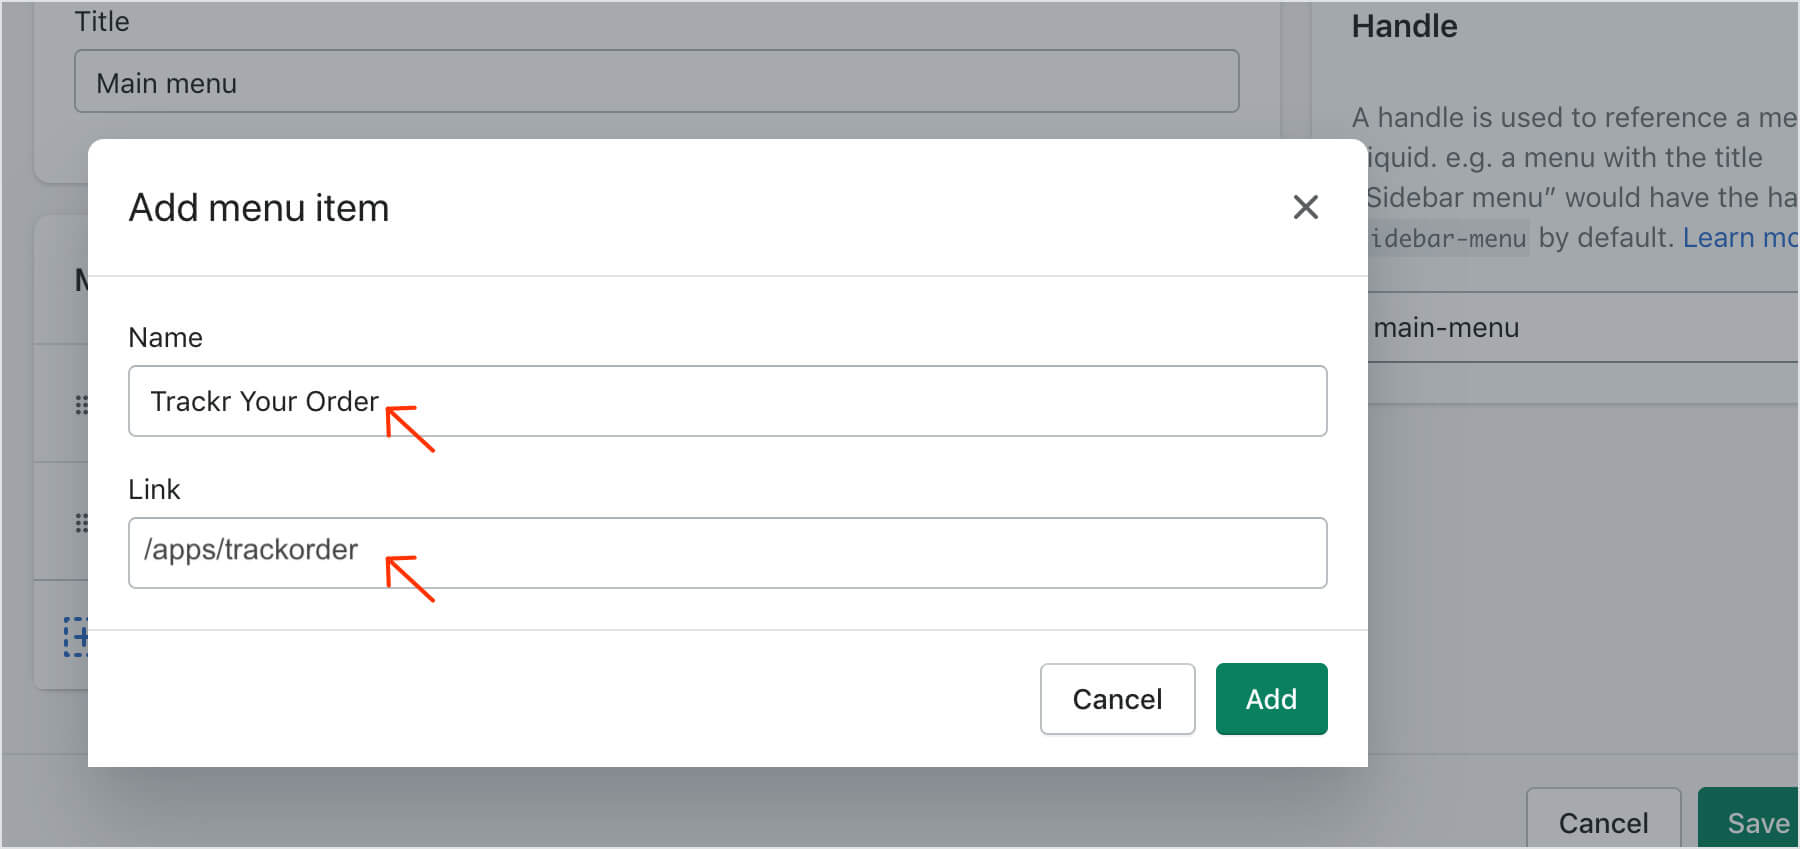
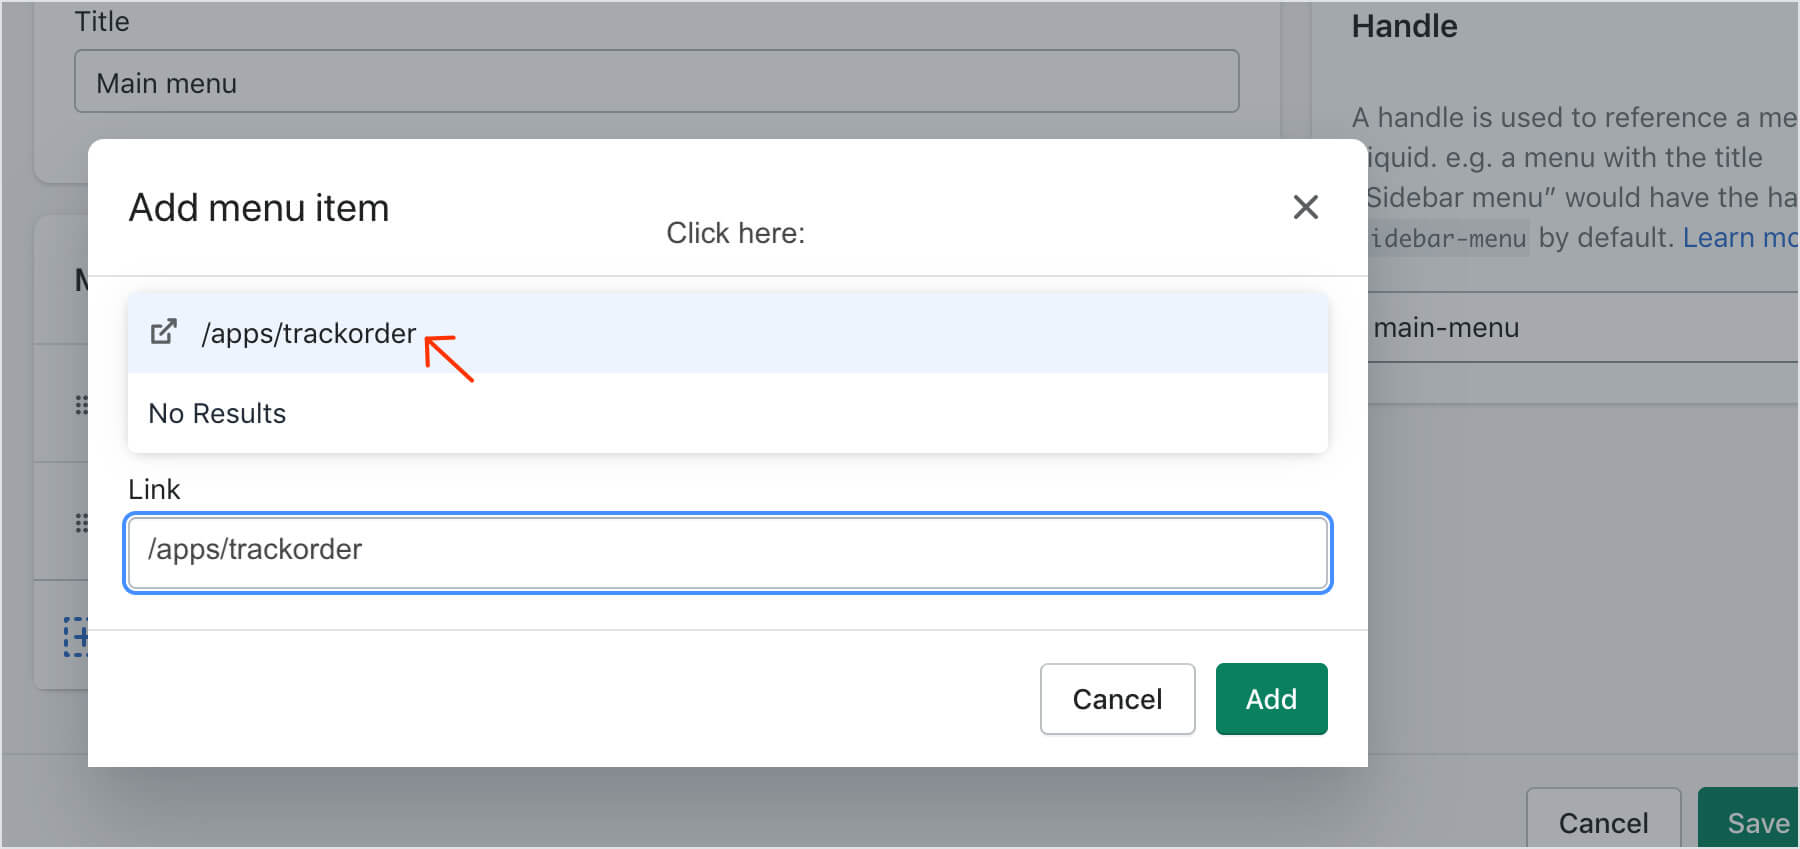
- In "Add menu item" pop-up window: give menu item a Name: e.g. Trackr Your Order. Type or copy-paste /apps/trackorder in the Link field
- The option showing this link will pop up. Just select it and press Add button.
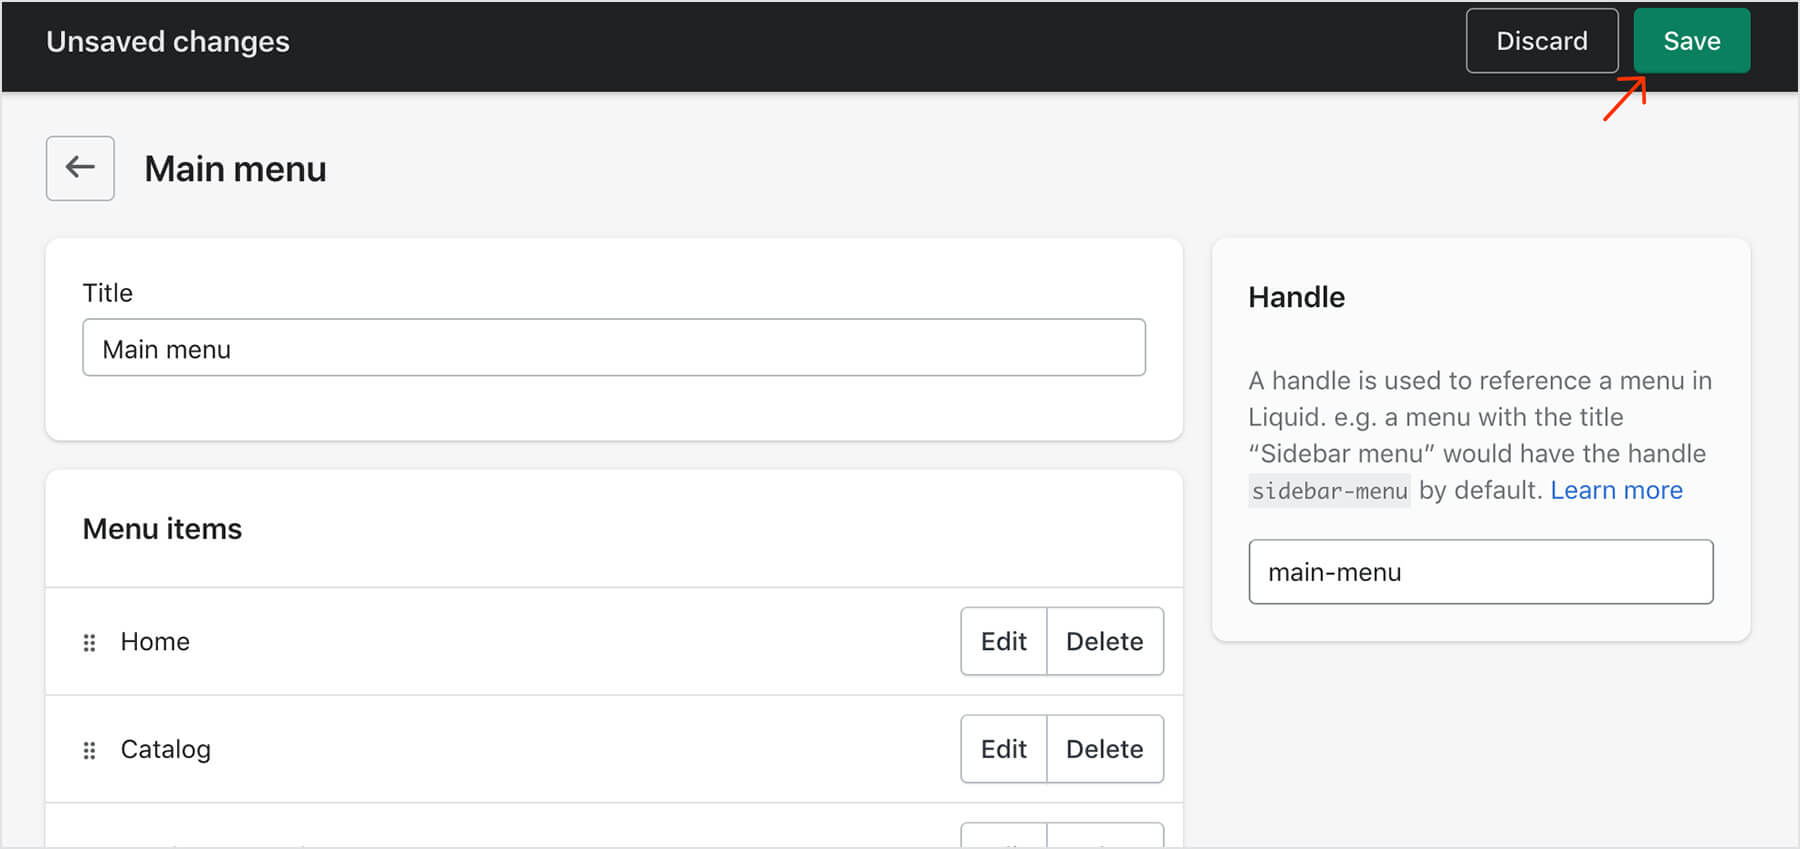
- Save changes
Can I customize my tracking page?
Yes, your tracking page and email notification letters about order shipment status updates can be easily adjusted to match your stores theme and design. Please find all customization options on the Trackr app. Also, if you have any questions or need help regarding tracking page customization - please contact our support: support@parceltrackr.com. We'll be more than glad to help!
To find all customization options go to Settings > Tracking page settings
Can I edit my Tracking page URL?
Yes, sure!
Default URL of Trackr tracking page on your store is https://storename.myshopify.com/apps/trackorder
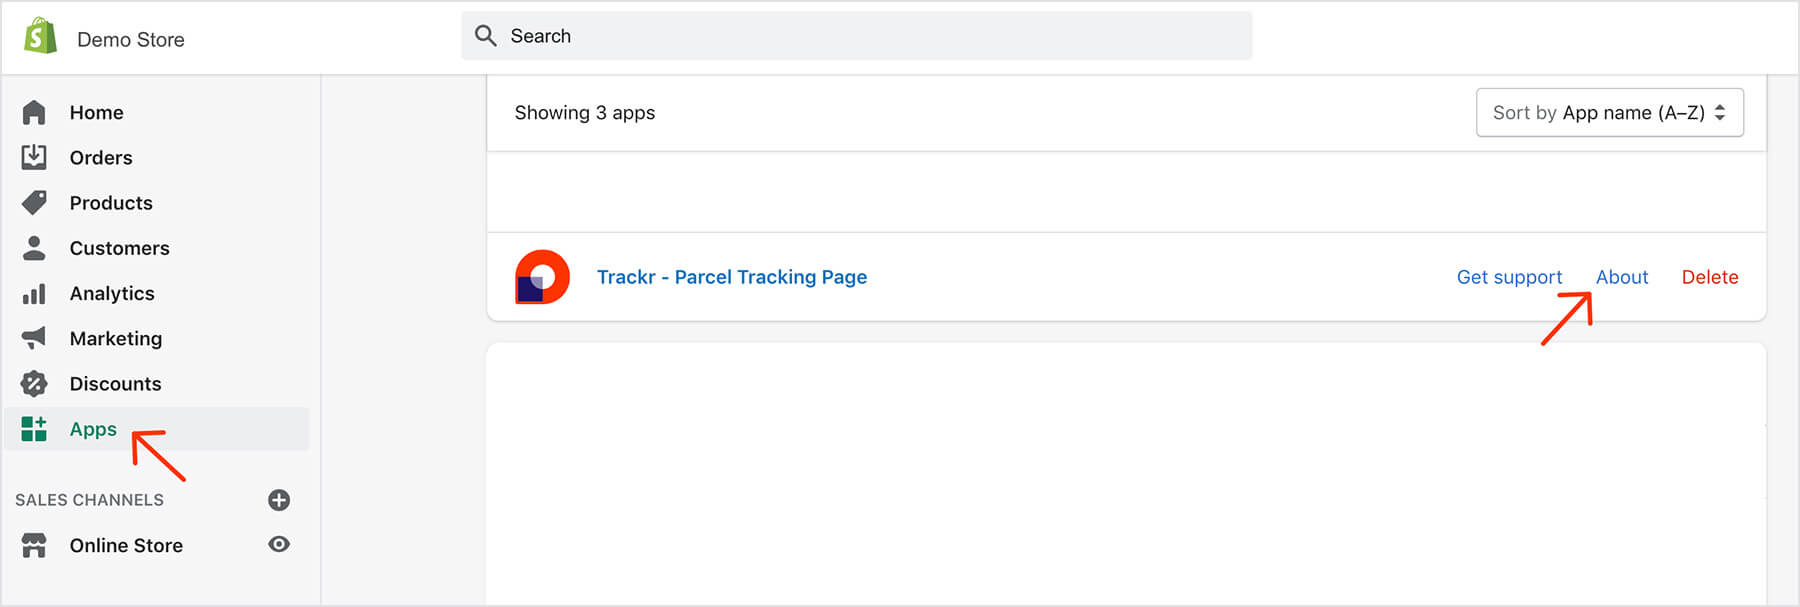
It can be changed following these steps:
- In your Shopify admin, please go to Apps menu, click the About link next to Trackr application:
- Scroll down to App proxy section and click on Customize URL button:
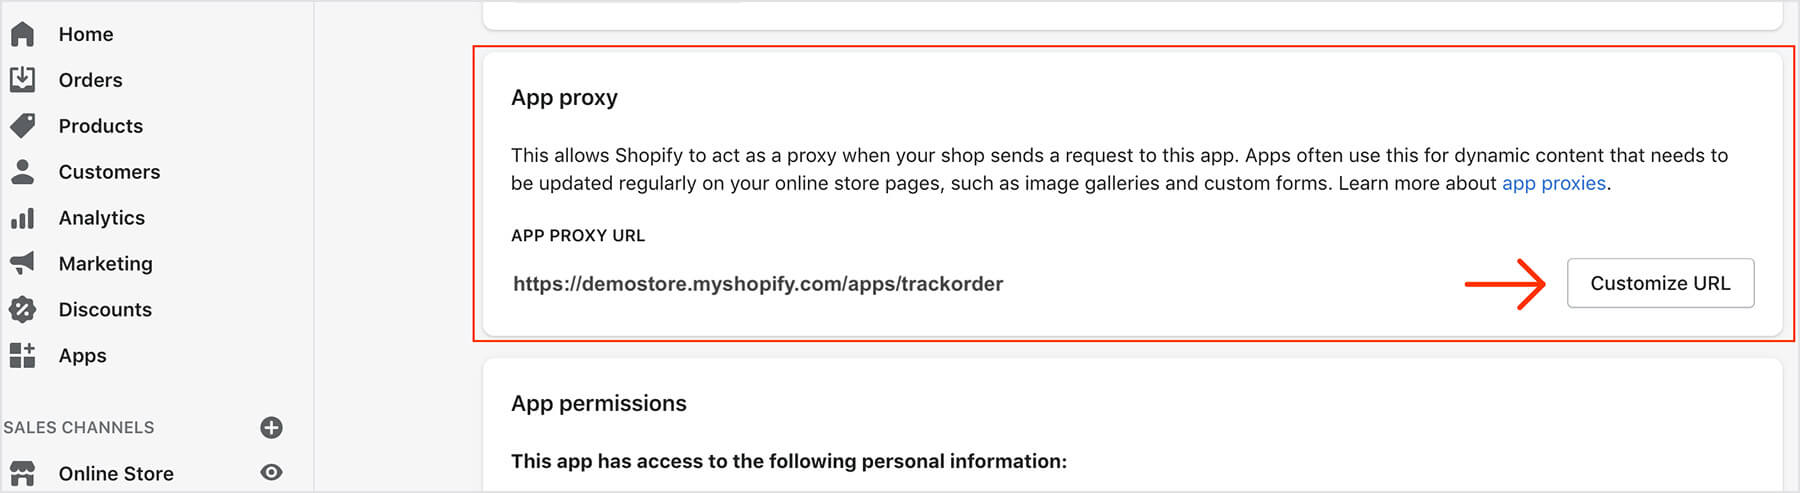
- You can choose from 4 different URL combinations (apps // a // community // tools) and add any ending of the URL (instead of "trackorder" in example bellow) in a separate field:
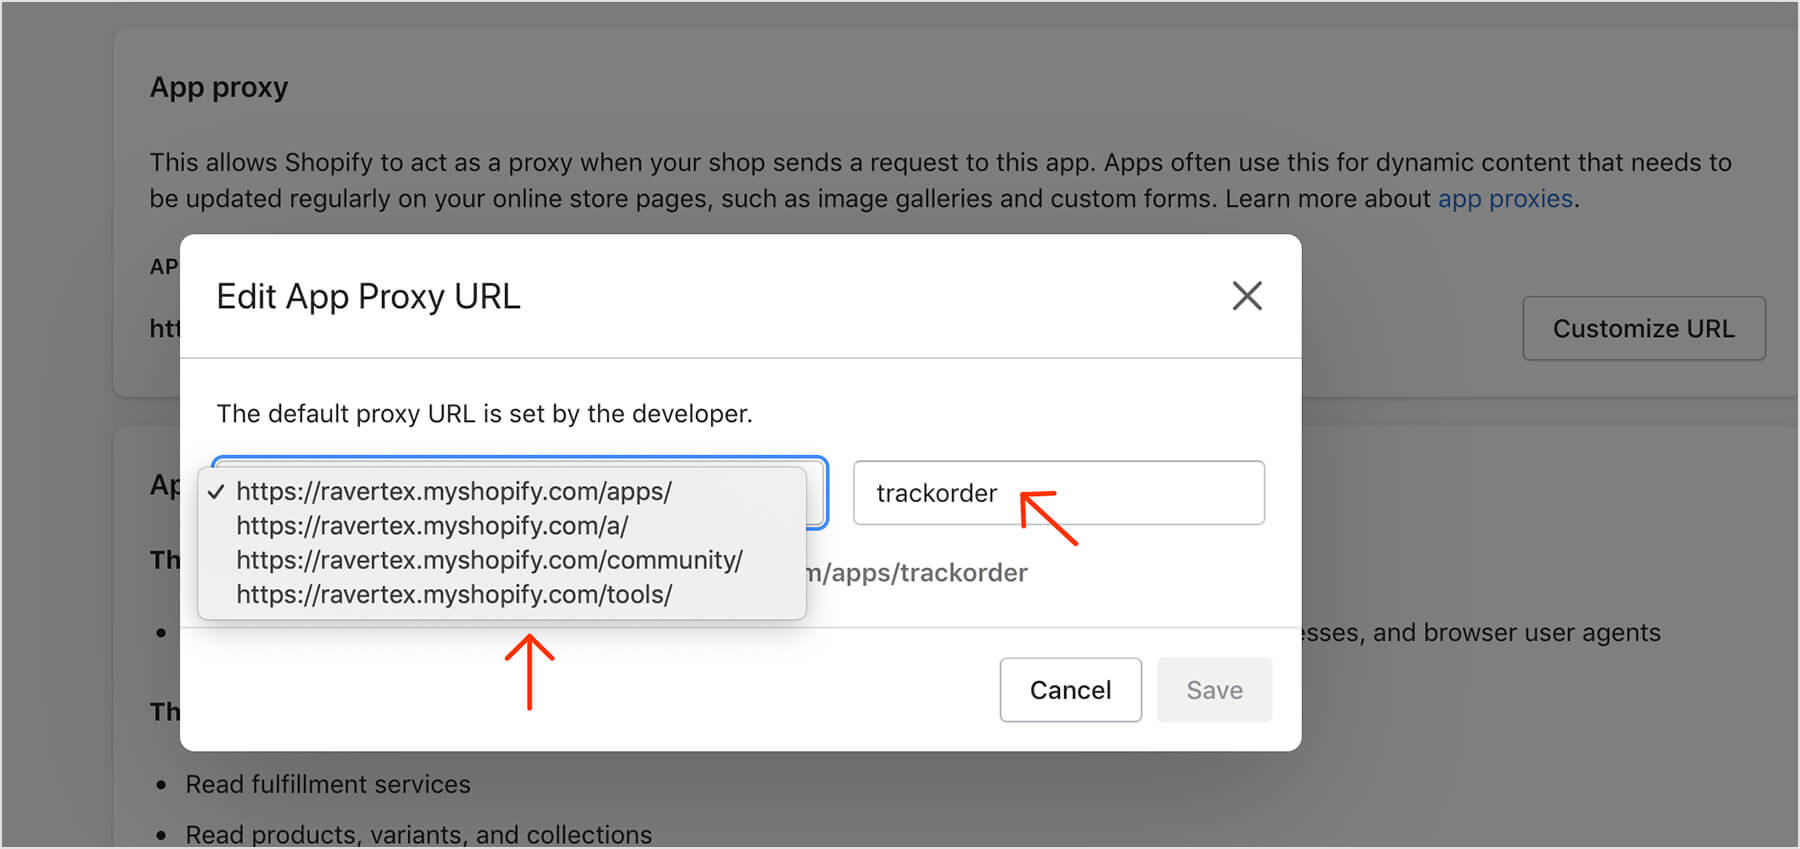
- Save the changes.
Please note that when a proxy URL is edited the menu item link path in a "Navigation section" must be replaced accordingly! (Follow the instructions of FAQ =>How to add Trackr page to your store menu).
Can I add a tracking link to Shopify email templates?
Yes, you can add a tracking link to your Shopify email templates and customers can track their package on your store's tracking page by clicking the tracking link in the email.
Feature is supported for bellow mentioned Shopify email templates. The result - updated URL link under the button "View your order":
- Order confirmation
- Shipping confirmation
- Shipping update
- Out for delivery
- Delivered
Please follow the steps bellow to add a tracking link to any of above mentioned emails. Let's take Order confirmation email as an example: 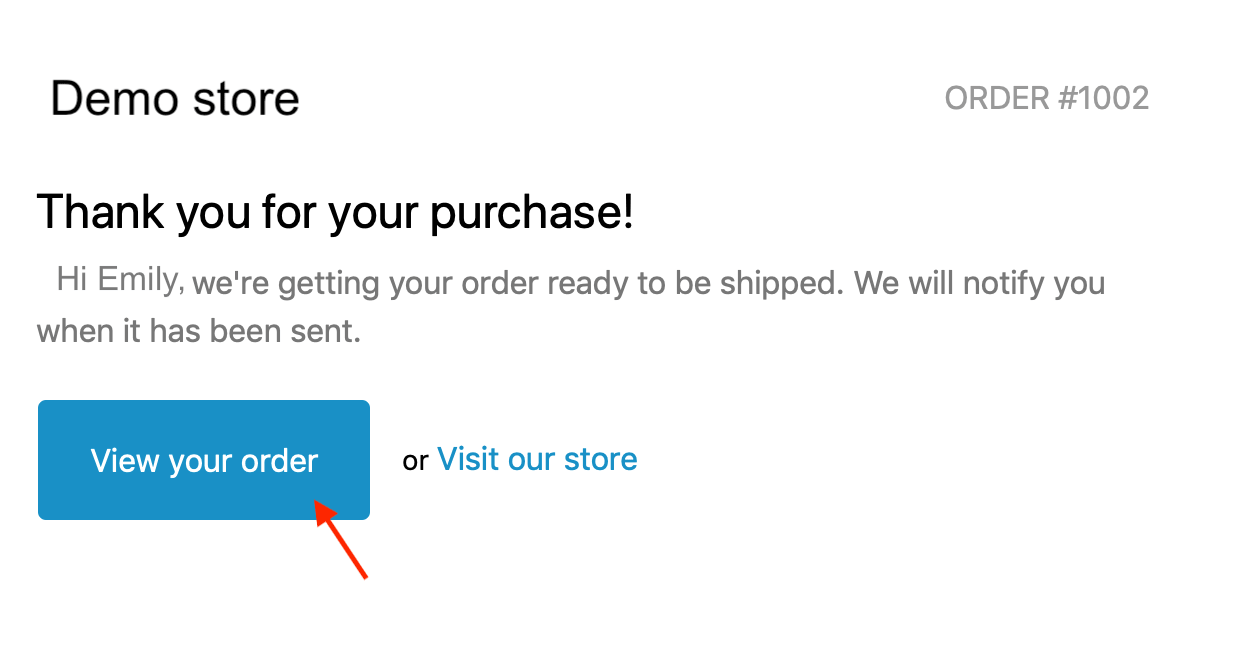
- Navigate to your Shopify admin dashboard Settings > Notifications > Order confirmation (or "Shipping confirmation", or "Shipping update" notification, etc.)
- Search (CTRL + F or ⌘ + F) for the phrase "View your order"
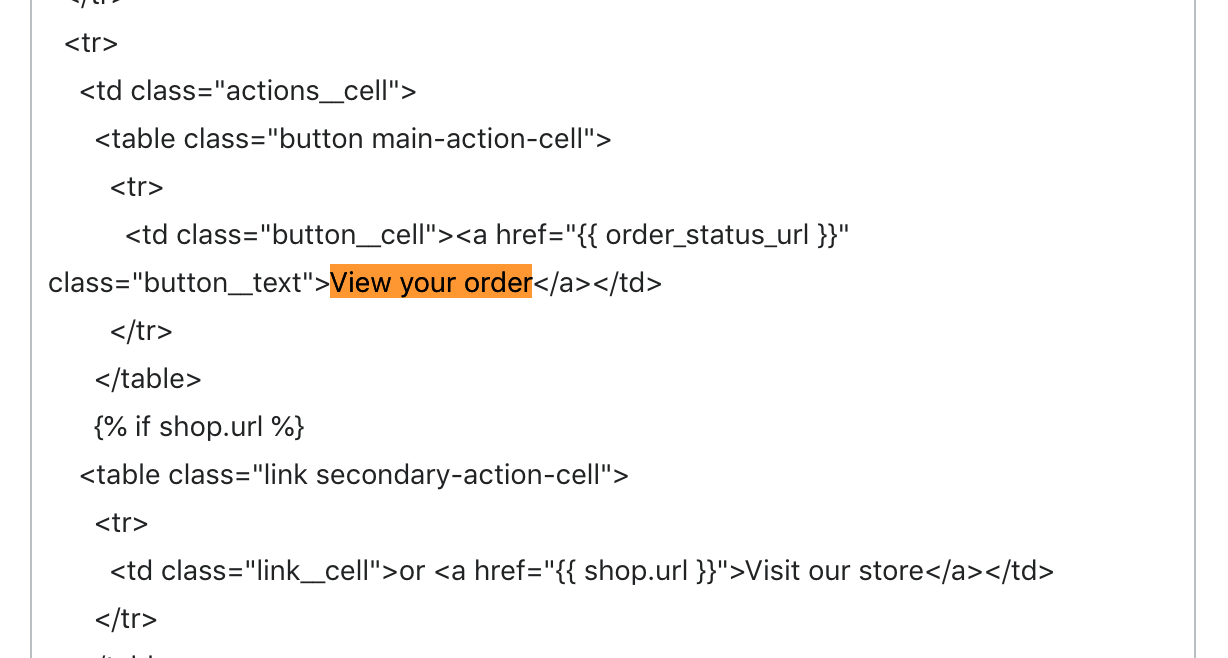
- Press "Save". The result will look like this:
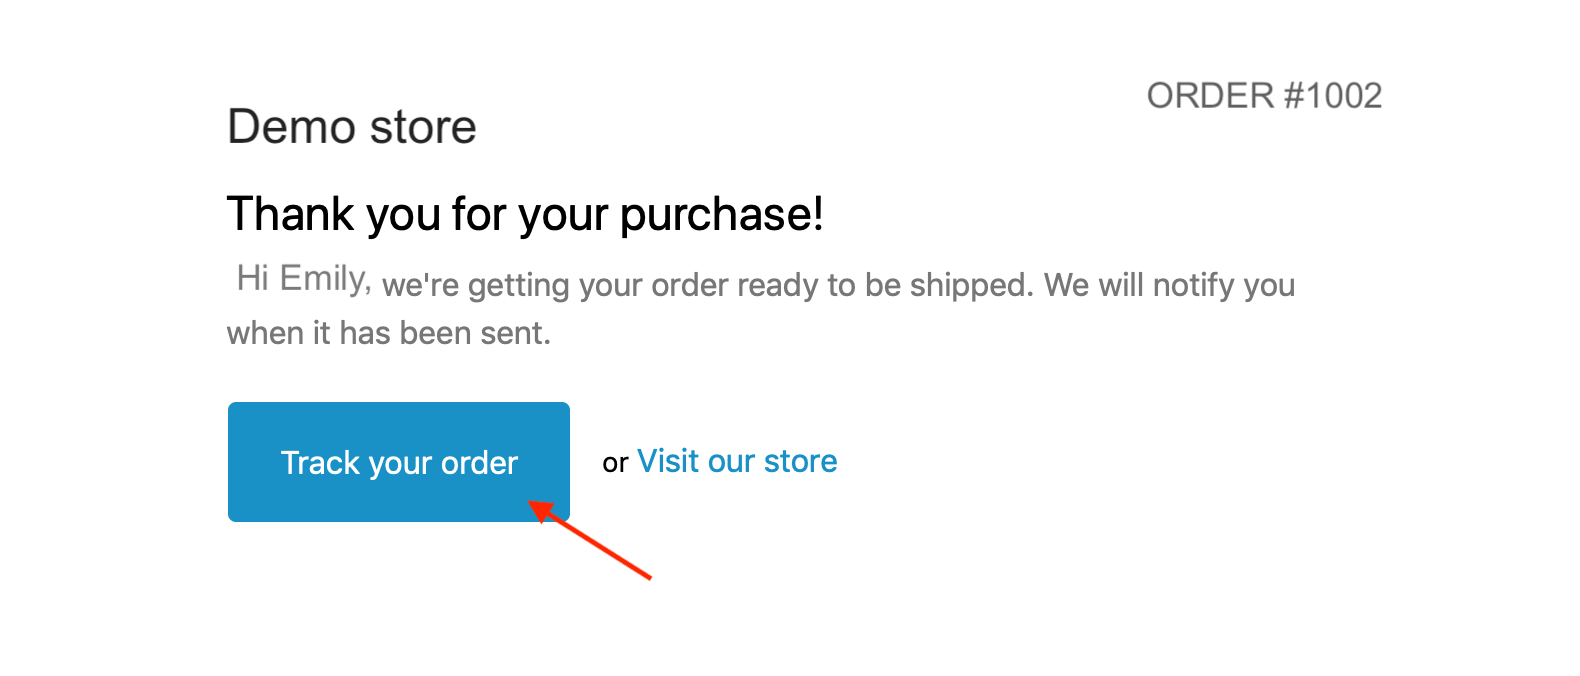
Replace this code:<a href="{{ order_status_url }}" class='button__text'>View your order</a>
with:<a href="{{shop.url}}/apps/trackorder?order={{ order.name | remove: "#" }}&o={{ email | md5 }}" class="button__text">Track your order</a> 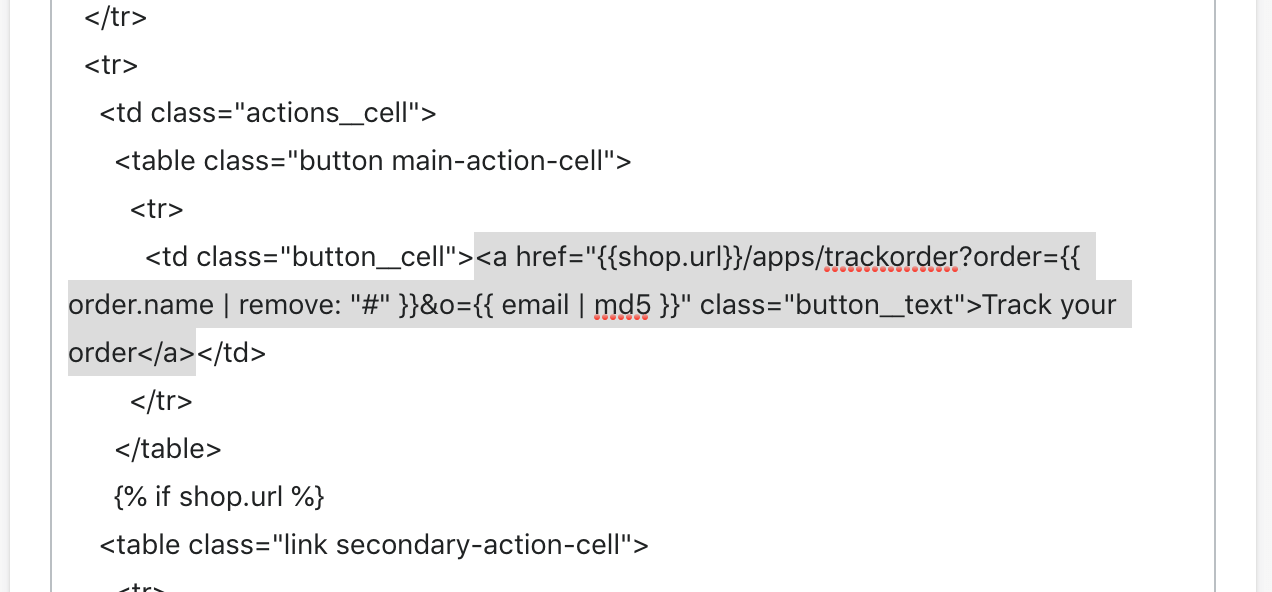
If you are modifying Out for delivery email notification, please search for a phrase Track my shipment instead of View your order and replace the same part of code as indicated above.
NOTE! If you have edited default Tracking page url https://storename.myshopify.com/apps/trackorder and changed it according to these instructions "Can I edit my Tracking page URL?", please update above mentioned part of inserted code "...apps/trackorder..." accordingly.
If you have any questions - please contact our support team support@parceltrackr.com and we'll help you to do necessary adjustments!
Why Orders fulfilment is important?
For Trackr to do the tracking, please assign the tracking number given by a carrier to an order. It can be done manually or automatically (using third-party fulfillment providers). When the order is fulfilled and tracking number is assigned to it, your customers will receive an email, containing this tracking no. They can use it to track their package on your website's tracking page.
Email notification service
- When email notification service is enabled, your customers will get email notifications about their order main status changes: "Ordered", "In Transit", "Out for delivery", "Delivered". Also once per 24 hours they will get email notifications about their order intermediary status updates - e.g.: "Prepared for shipment", "Dispatched from sorting center" - when such updates are provided by the carrier.
- After store owner enables this feature, since then each tracking number after order fulfilment is automatically registered in a tracking system and starts collecting information from a carrier. It means that each unique tracking number will use tracking plan resources. Store customers can search unlimited number of times for information updates about the same order and get unlimited number of notification emails about order status changes - information updates do not use additional tracking plan resources.
To enable email notifications, please Navigate to Apps > Trackr > Settings > Automatic email notifications 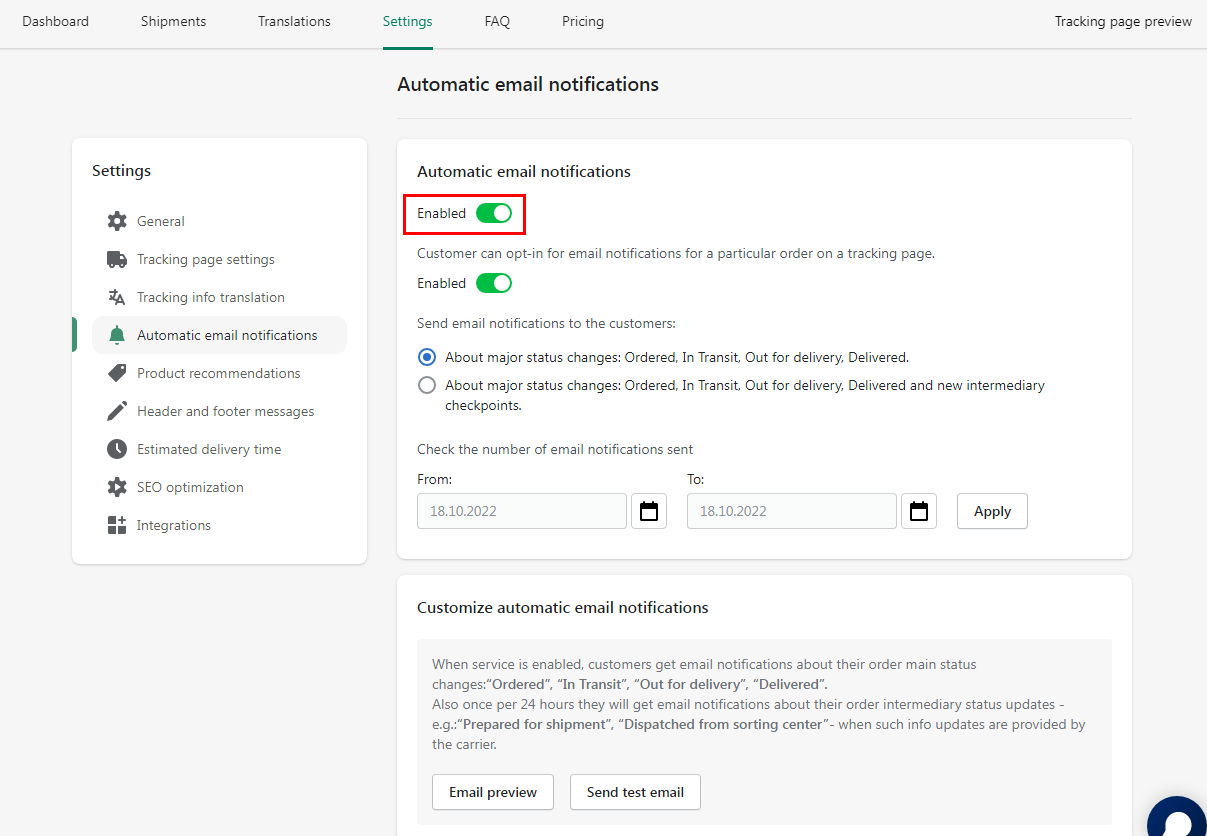
There are also the advanced email notifications settings. On this page, you can:
- Enable customers to opt-in for email notifications for a particular order on a tracking page.
- Choose what type of notification to send to your customers.
- Set links, text, background colors and attach your brand logo.
- Write your own message to customers.
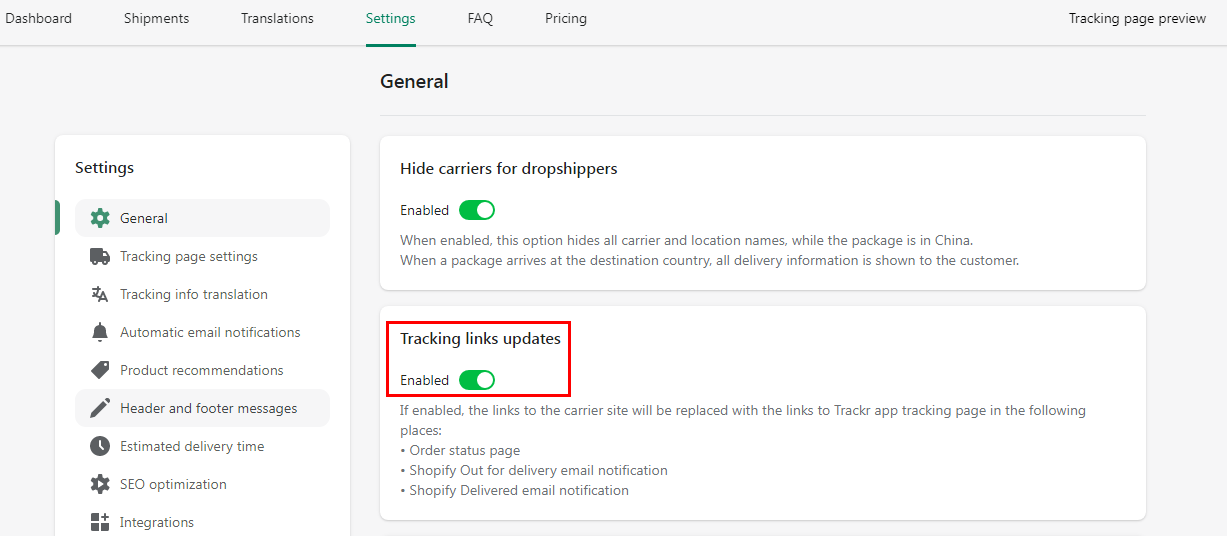
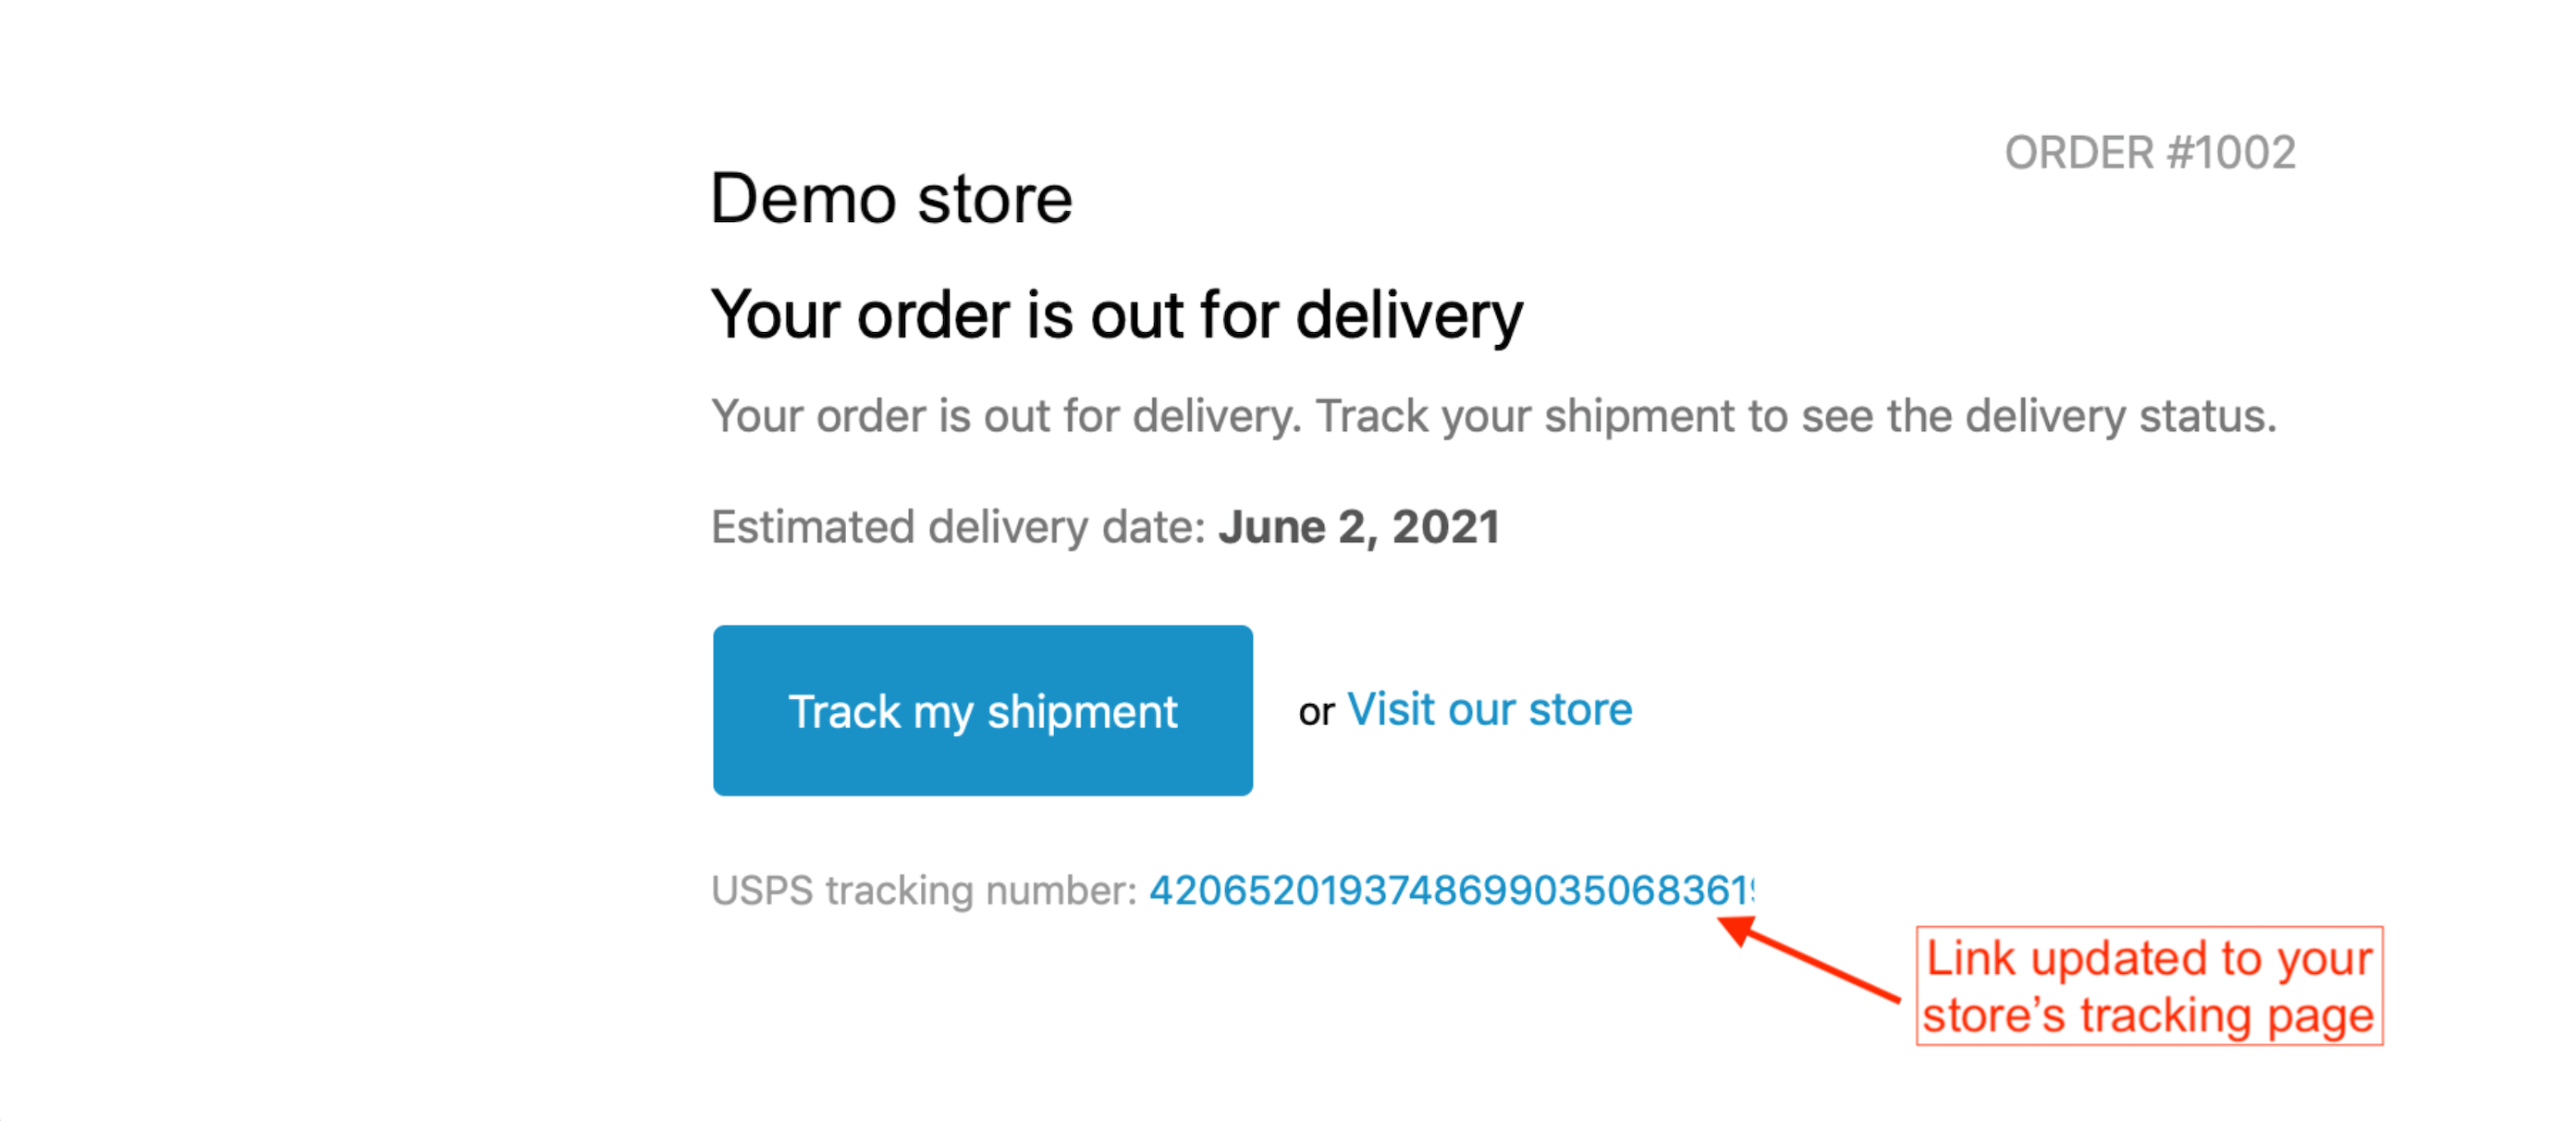
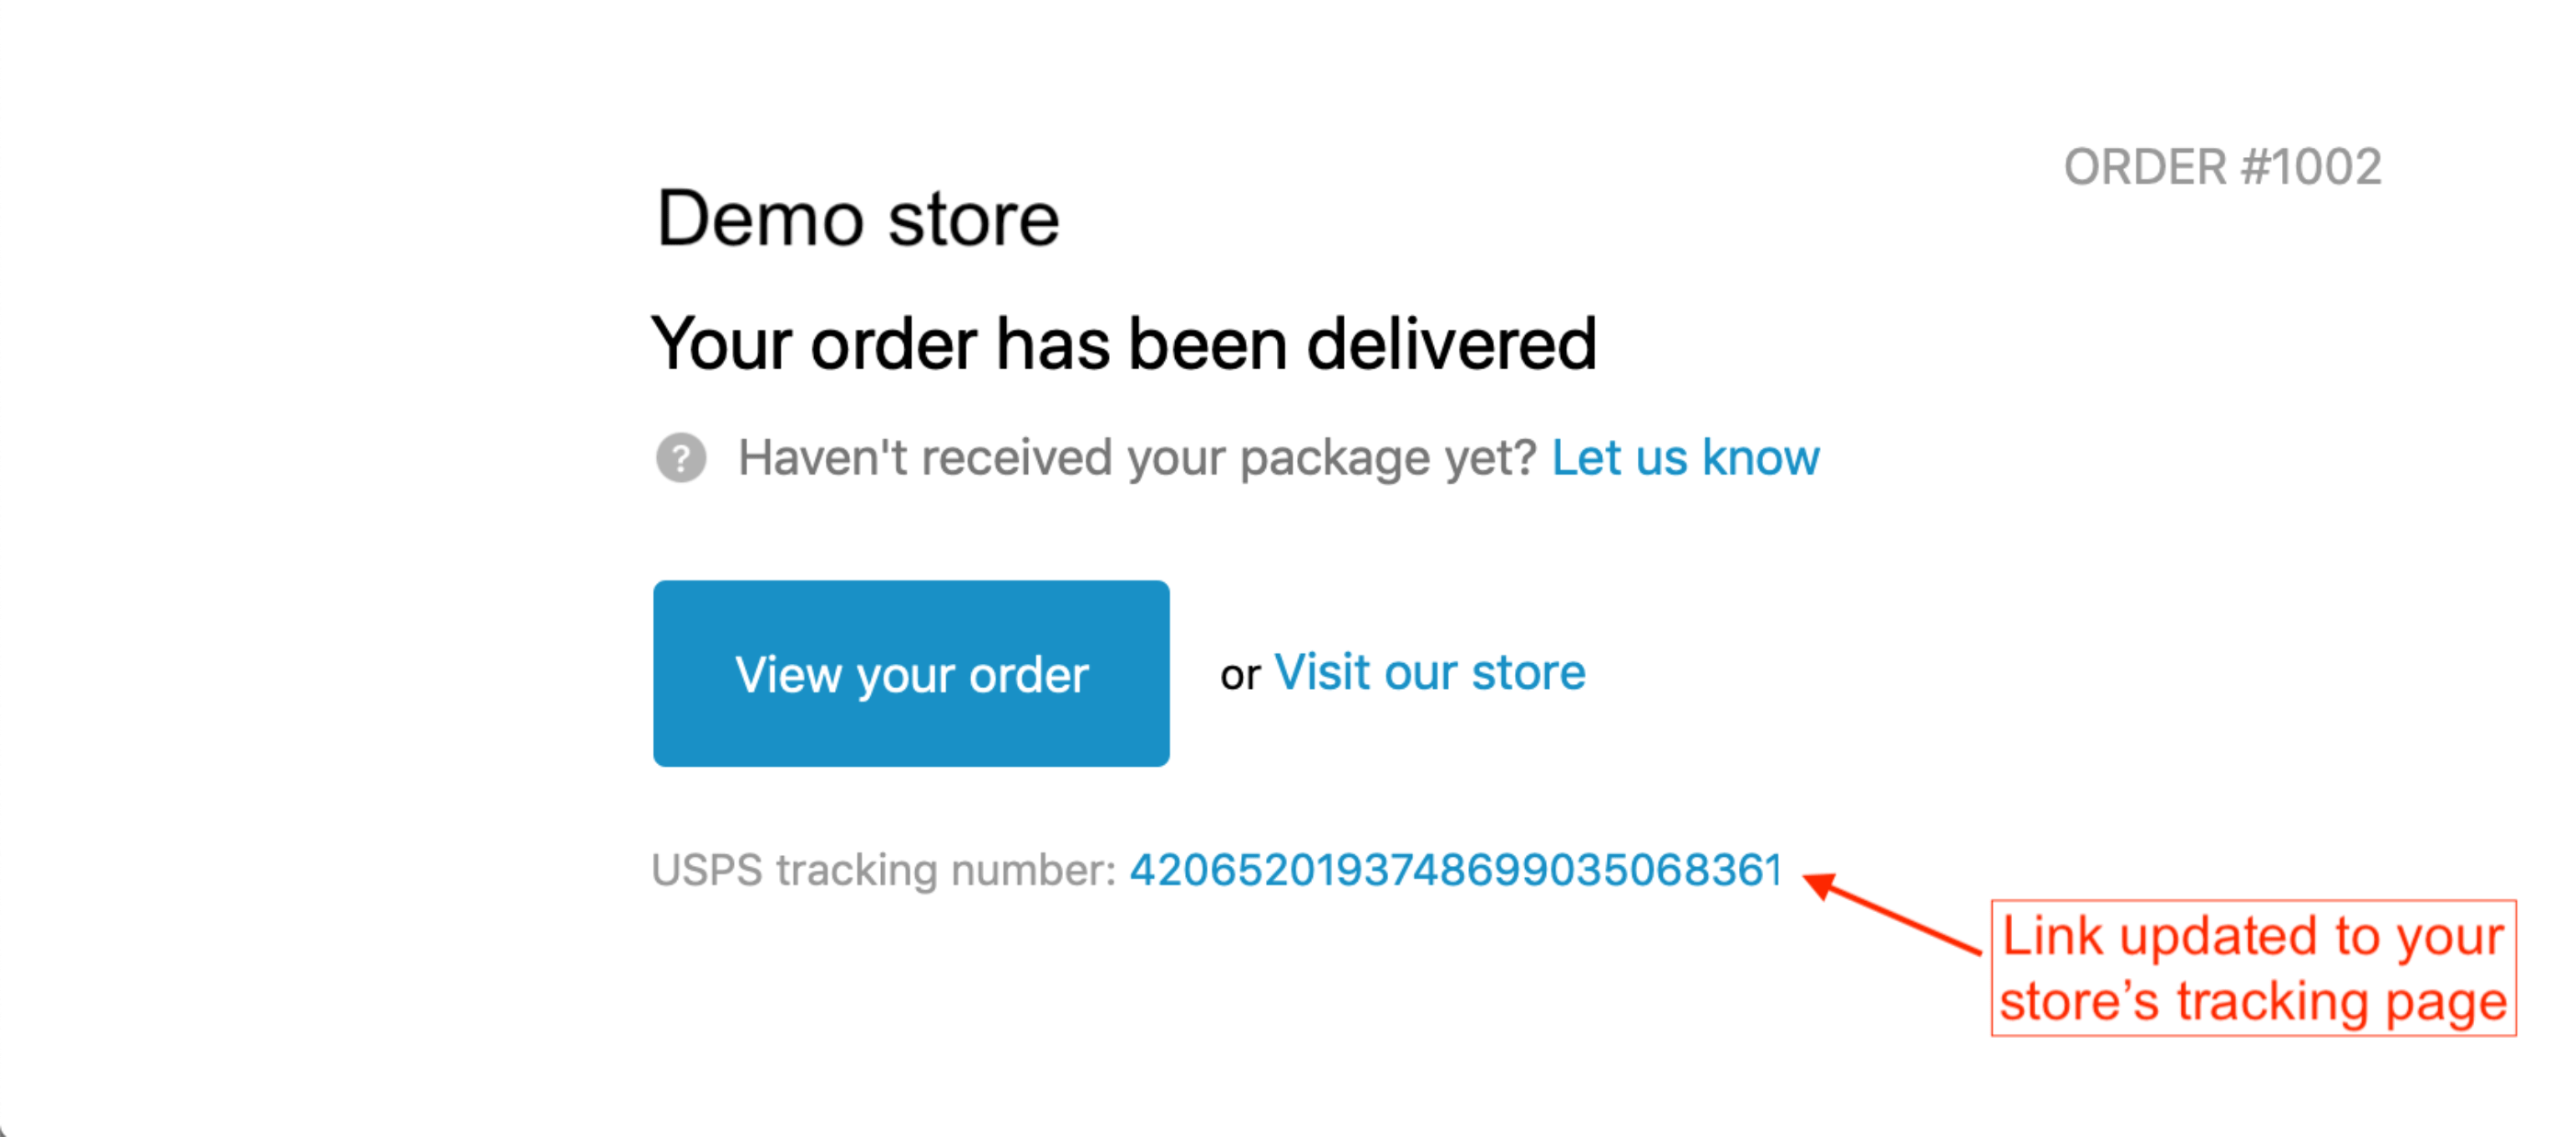
Tracking link updates service
Tracking link updates service - enabling this feature will ensure that the tracking URL's of a newly-created or modified orders will be automatically updated with Trackr app links to the store's tracking page instead of a carrier's website in the following places:
- Order status page
- Shopify Out for delivery email notification
- Shopify Delivered email notification
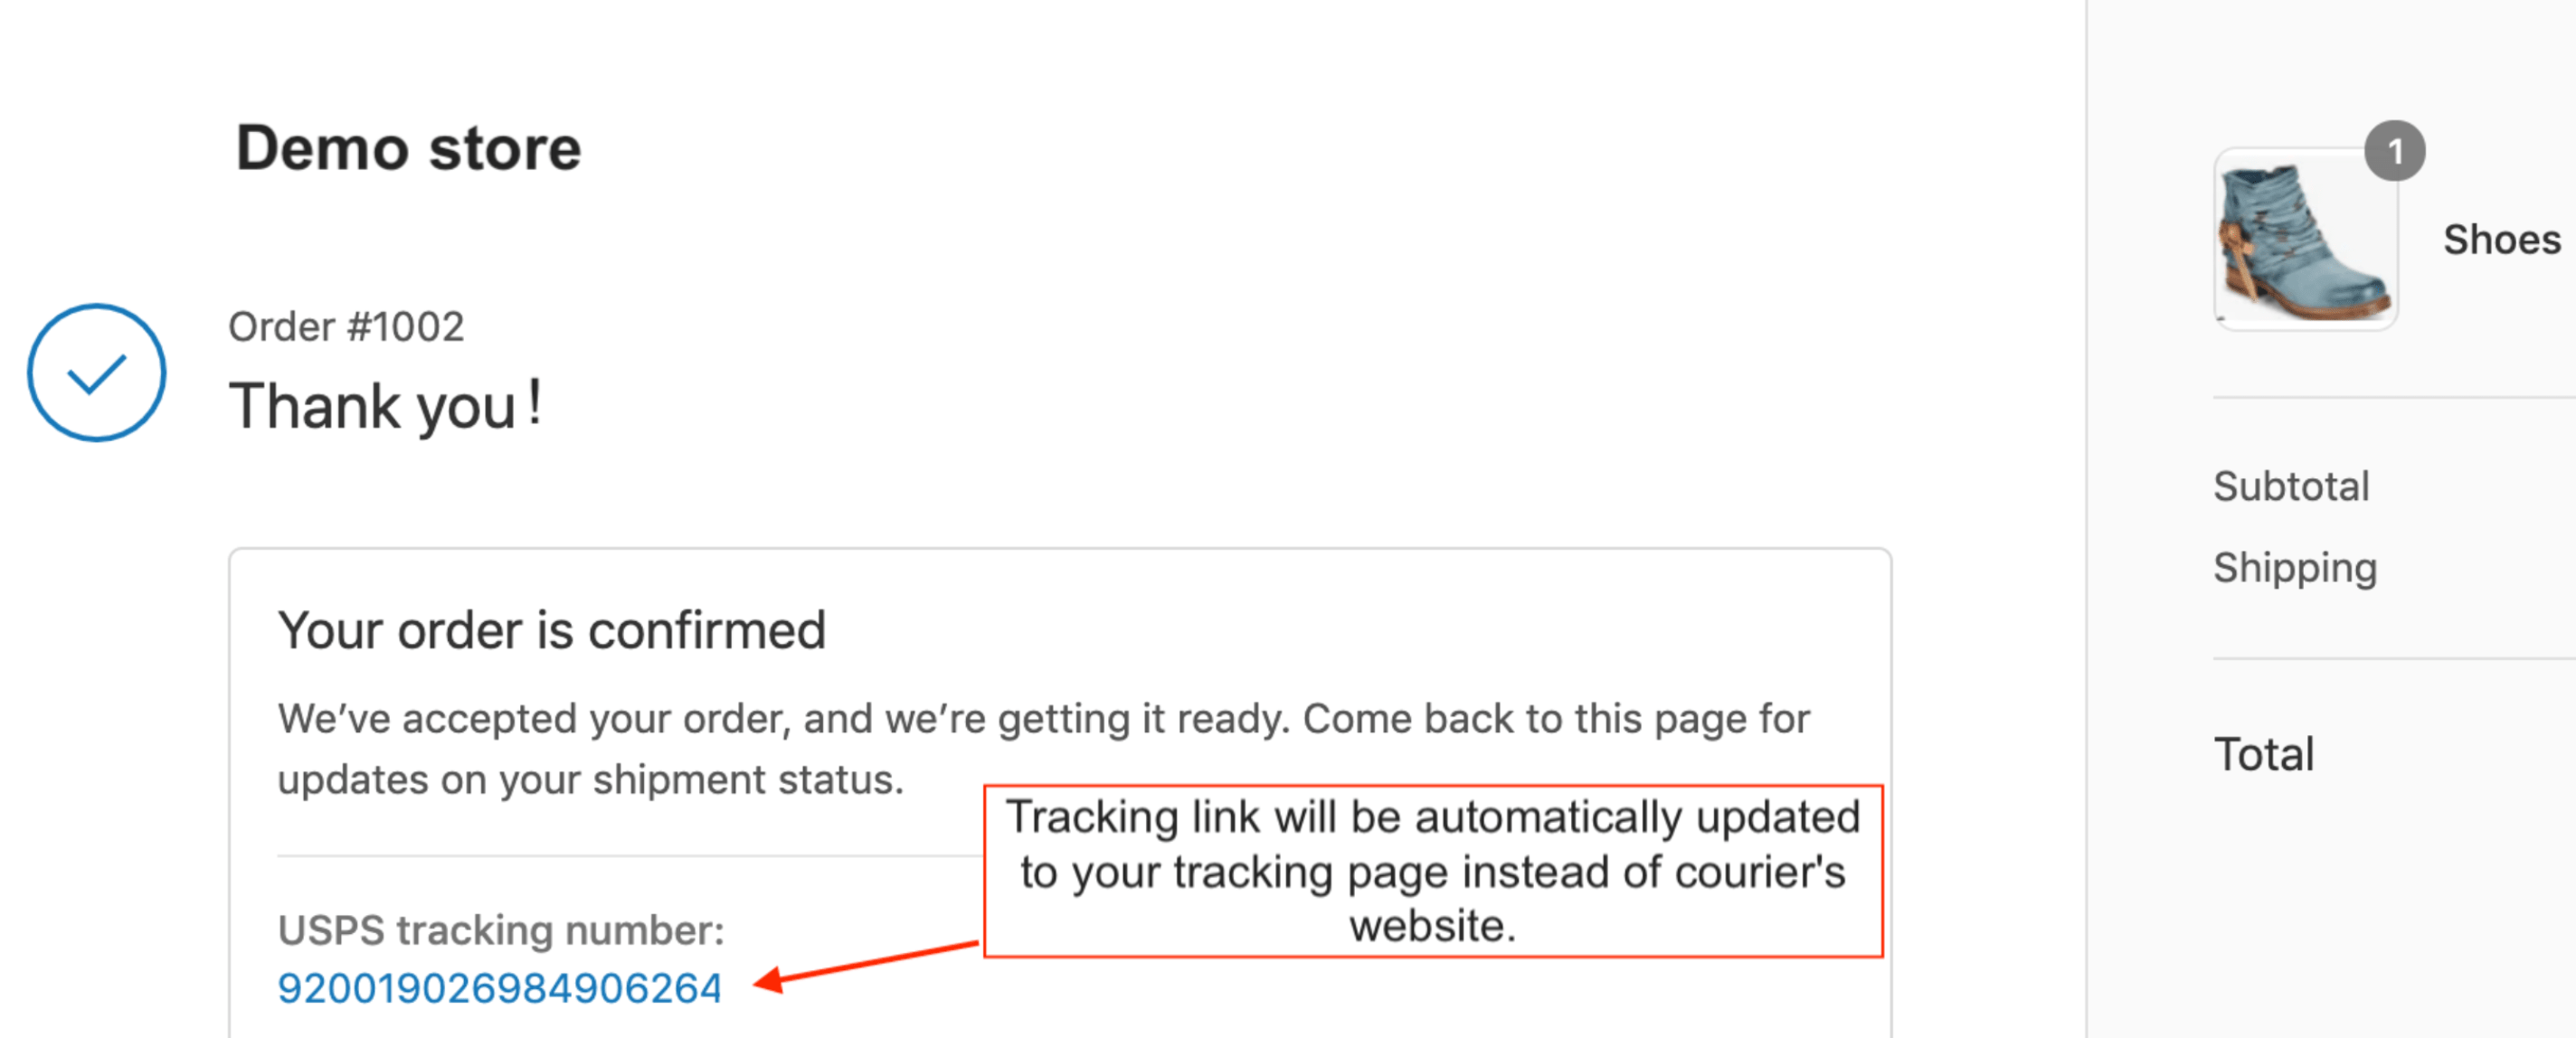
Please find the examples in screenshots bellow.
How to enable this feature on Trackr app preferences:
- Navigate to Settings > General
Enable Tracking link updates service:
And tracking URL's will be updated:
In Order status page:
Shopify Out for delivery email notification:
Shopify Delivered email notification:
If you decide not to use this feature anymore and disable it, links will not be included in any future orders, but will stay visible on the past shipments.
If you have any questions regarding this feature, please contact our support - support@parceltrackr.com
When my tracking plan resources are being used?
- Tracking resources usage is related to unique tracking numbers in fulfilled orders. Each unique tracking number which is assigned to an order and requested to provide shipment information from a carrier uses tracking plan resources.
- Orders from the past 30 days have been synced into the app. To sync additional orders, you can opt for our top-up service.
- If you have turned ON email notification service and want to provide up-to-date information to all your customers about shipment status changes, then each tracking number after order fulfilment is automatically registered in tracking system and starts collecting information from a carrier. It means that each unique tracking number will use tracking plan resources. Your customers can search unlimited number of times for information updates about the same order and get unlimited number of notification emails about order status changes - information updates do not cost additionally.
What does the "Order not found" message on the tracking page mean?
This message shows that Trackr is not able to provide tracking information because order is not fulfilled (Order ID is not related to a tracking number). That is a necessary condition for Trackr to do the job. If you have any questions in such situations, please contact our support team support@parceltrackr.com and include below listed details in your email:
- Tracking code which does not pull up tracking details
- Shopify order number which is associated with that tracking code
- Your store's URL at Shopify
We'll do our best to get the tracking issue solved ASAP!
Why "Pending" status of an order is sometimes shown?
"Pending" status is usually shown for a newly created orders. In such cases Trackr waits for information updates from a carrier. It might take from 1-5 days for a carrier to register tracking code in their system and start providing information. When information is received - tracking number gains a new "In Transit" status and shipment checkpoints with up-to-date information appear on a tracking page.
Which carrier should I select?
Trackr app will automatically detect carrier based on assigned tracking numbers. No need to make any manual selection.
Why don't I see tracking information after I've installed the app?
All shipments which are new or in transit during the installation are registered by the app and tracking information will be provided. The app will display tracking details solely for the last shipment that were delivered prior to the installation of Trackr, if such shipments exist.
Can I translate the tracking page?
Trackr integrates with Shopify Markets and allows you to translate a tracking page into the language of each Market. For it, please go to Trackr app > Translations. ![]()
Here, you can specify the language of the Market and add your translation for the following blocks:
- Tracking search blocks
- Tracking search results block
- Error messages
- Info messages
- Shipment status descriptions
- Shipment statuses
- Shipment status hints
- Delivery update email’s subject
- SEO
You can also specify the language for All supported markets. It will be displayed for your Markets that are left without translations.
Besides, Trackr supports 5 languages - English, French, Spanish, Italian, and German. But, you can add your own translations for these languages via Markets on the Translations page.
If all translation types are enabled:
- The translation for the specific Market and language always goes first.
- If no translation is set for the Market, then the translation for All supported markets will be used as a fallback option.
- If the language is not specified both for a Market and for All supported markets, then one of Trackr's default languages will be used as the last resort*.
*In this case, the translation depends on the language the customer is browsing in. However, if this language is not one of the five default languages (EN, FR, SP, IT, DE), then English will be used as a fallback option.
Where can I add product recommendations?
There are two options where you can add automatic product recommendations:
Tracking page
To enable the option, please go to Settings-> Product recommendations -> Automatic product recommendations.
Then It’s obligatory to select the collection of products to display.
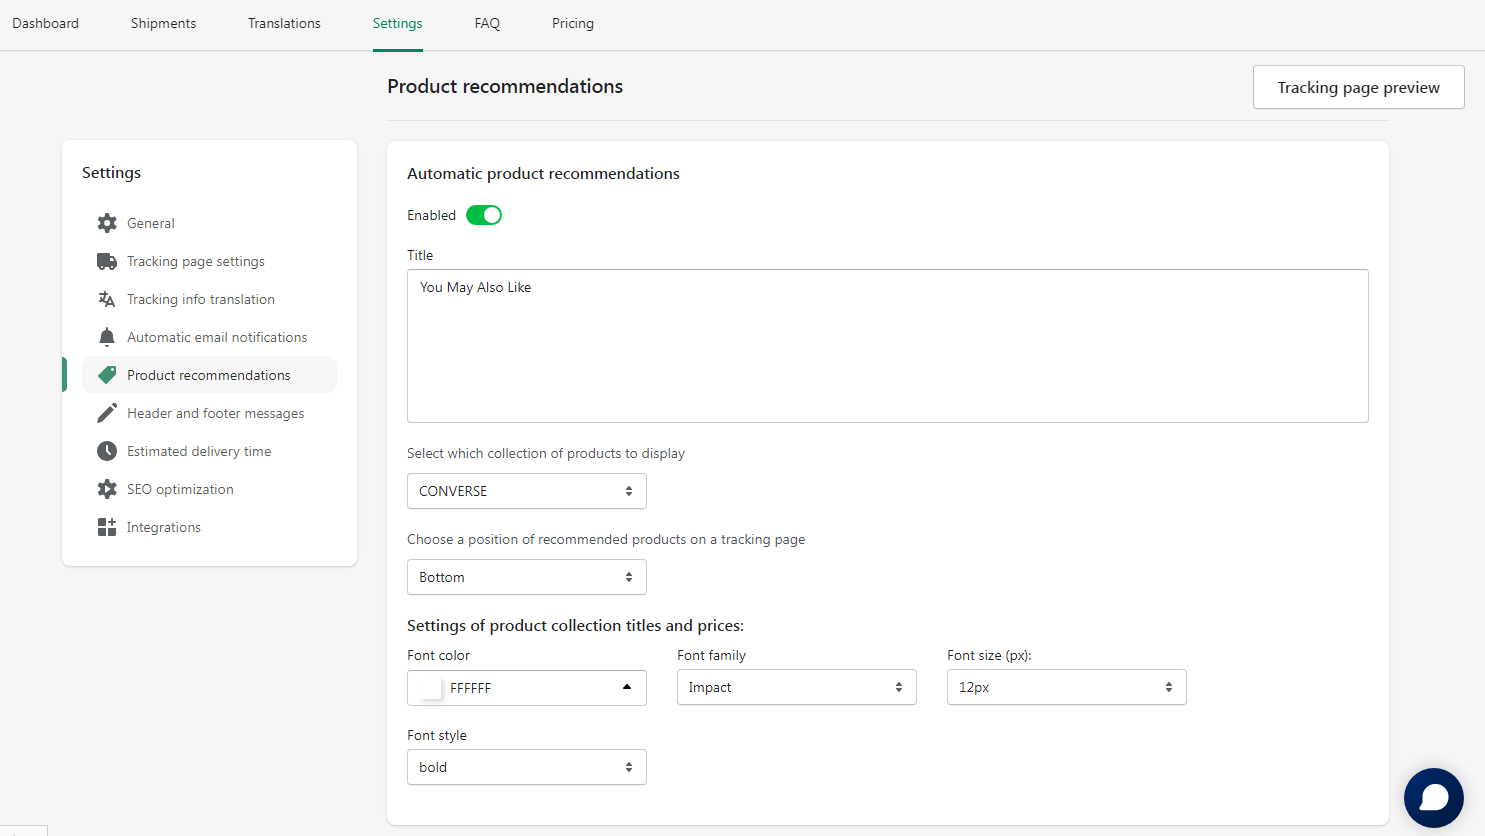
To check how it will look like, please click the tracking page preview.
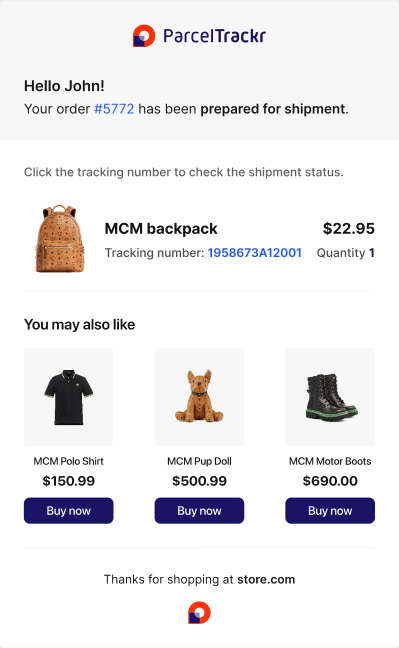
Email notifications
To enable the option, please go to Settings > Product recommendations > include product recommendations in email notifications.
Set the number of related products in email and the appearance of the button.
The collection of products to display in the email will be the same as it’s set on the configurations above.

To check how product recommendations will look like in the emails, please go to Settings > Automatic email notifications > Email preview.
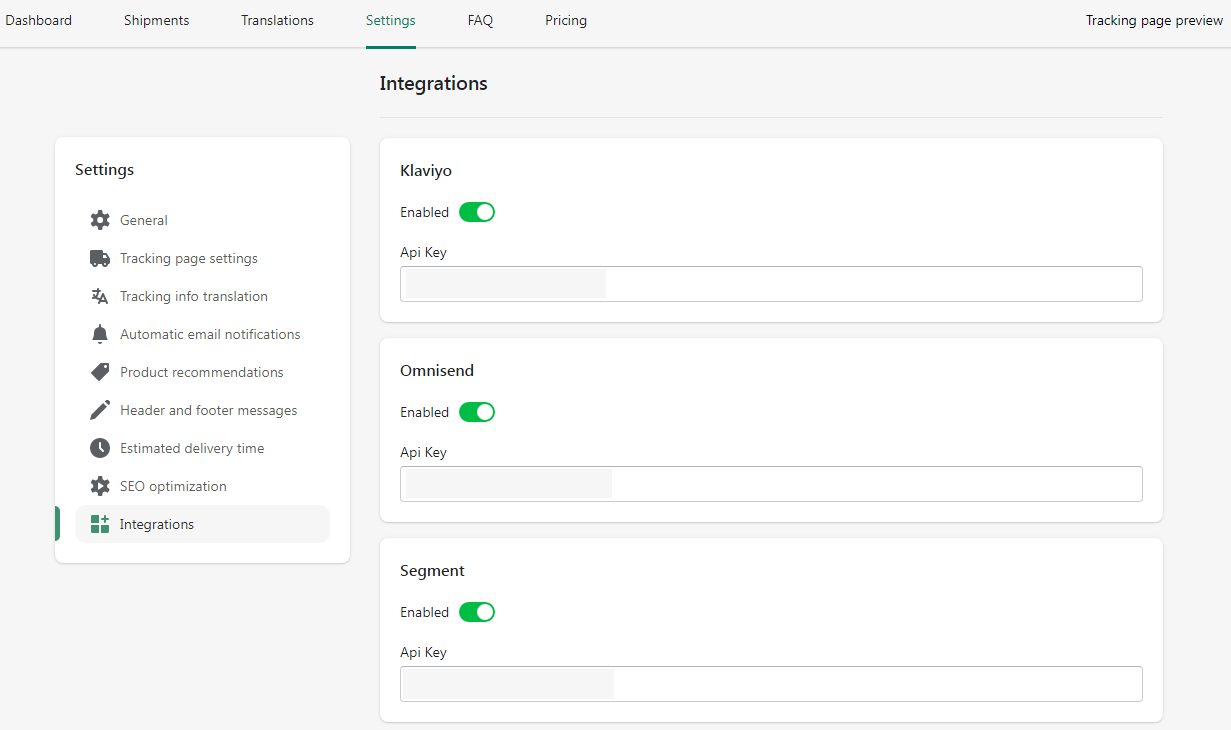
What integrations do you provide?
Trackr app is now integrated with Klaviyo, Omnisend, ecommerce marketing platforms for managing smart email campaigns, and with Segment.io - a platform to collect and integrate your customer data with hundreds of tools.
In order to enable any of the mentioned above integrations, go to Settings>Integrations.
Then insert API keys that can be found in your Klaviyo/Omnisend/Segment.io account.
In order to find Klaviyo API key:
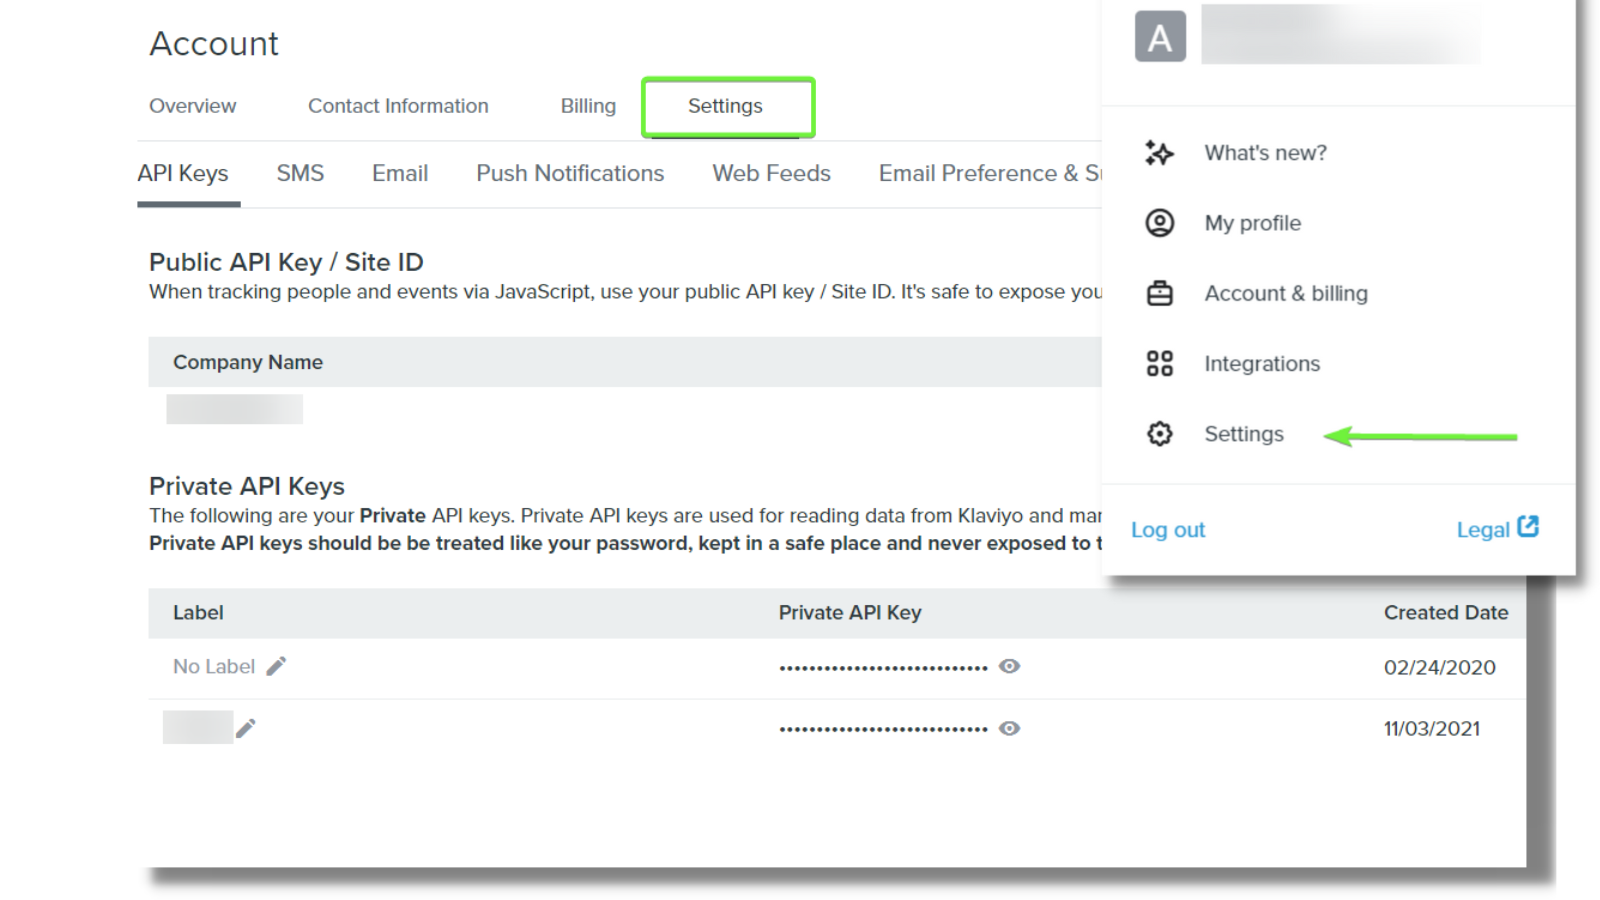
- Navigate to your Klaviyo account > Settings;
- Click API keys;
- Then Create API Key.
In order to find Omnisend API key:
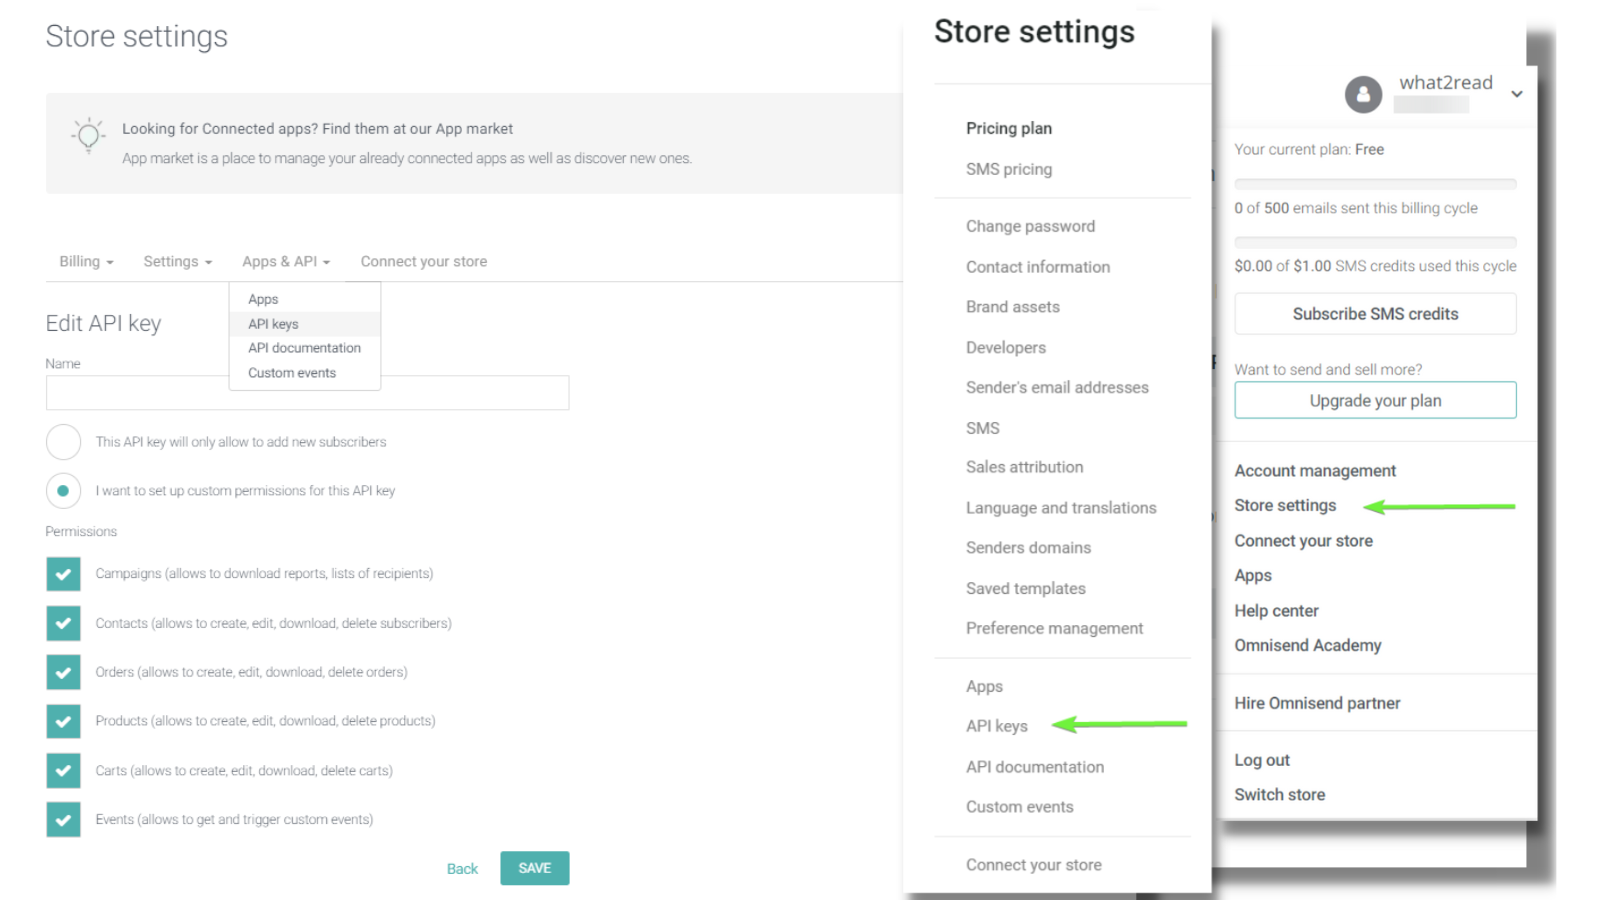
- Once you log into you Omnisend account, click on your account name and choose My account;
- Go to Integrations & API > API keys;
- Click Create API key.
To create Segment API key, you need to:
Log into your Segment account, choose Sources tab in the main menu and click Add source, choose PHP type of server:
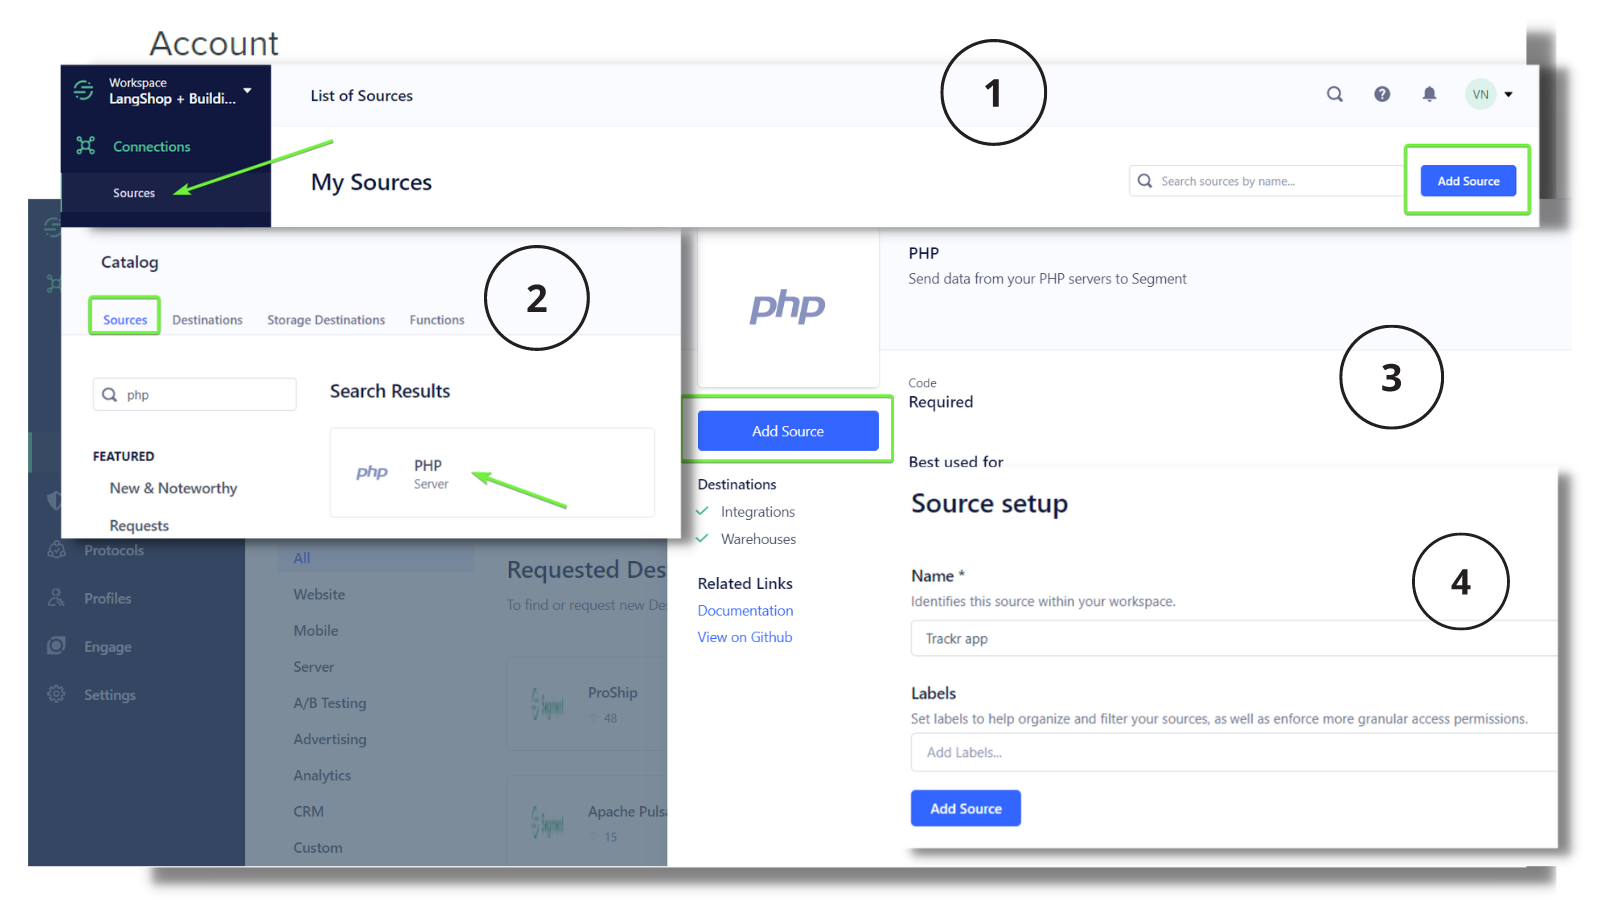
Give a new source name and check in the basic settings whether it’s enabled:
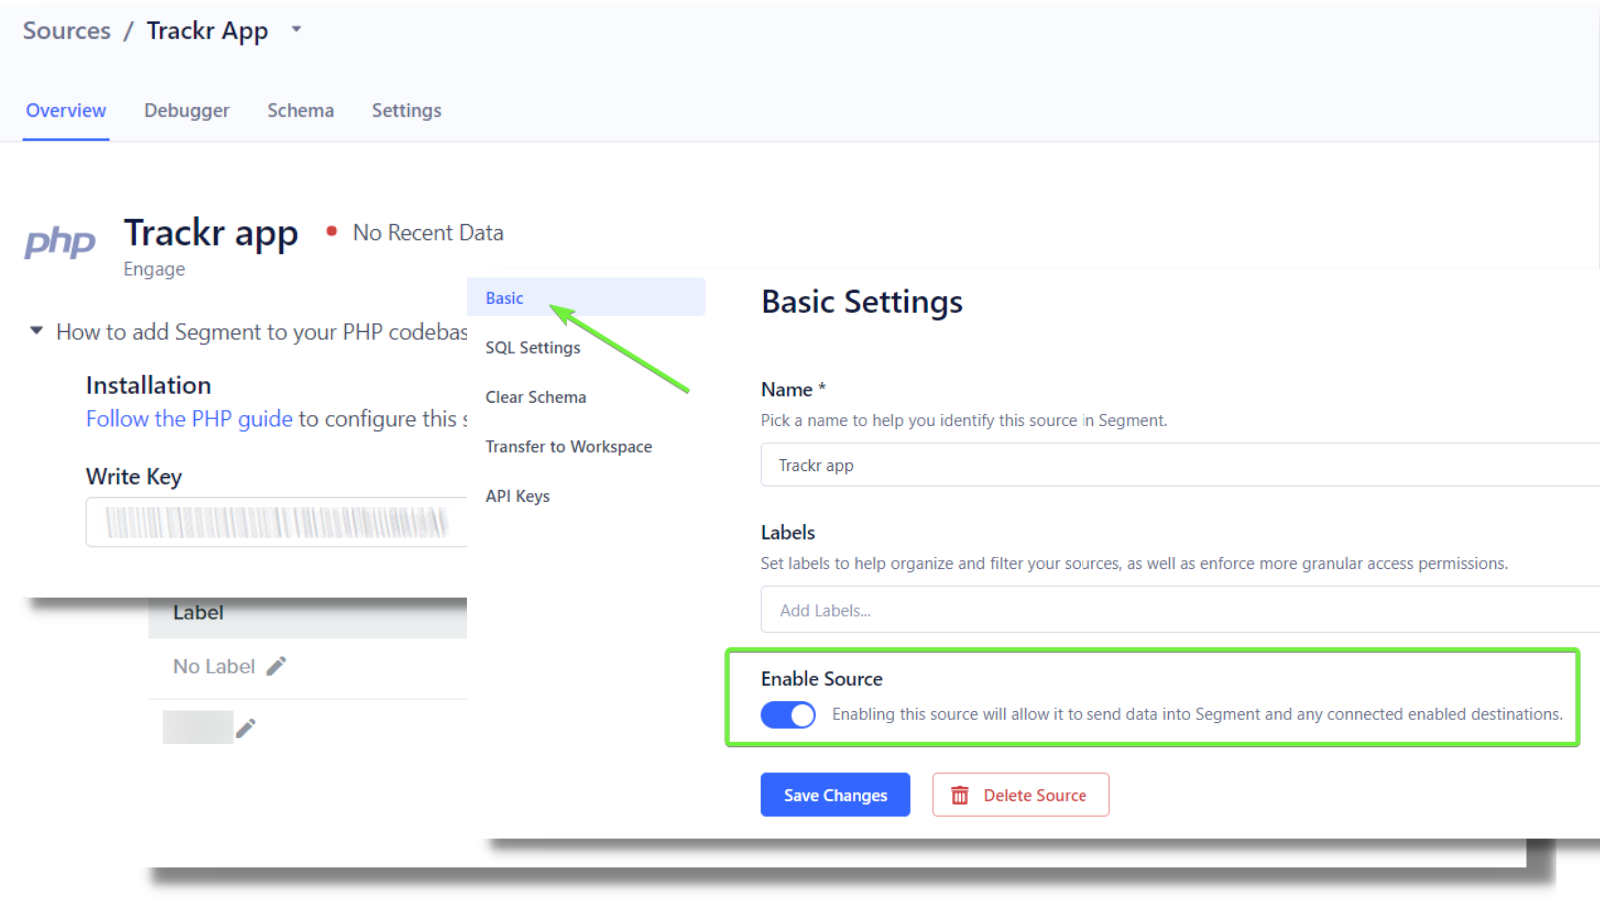
Add the necessary API key to the app settings and Save the changes.
Trackr collects the following user properties, and once the integration is set up, send them to the integrated platform:
- User name (or First name + Last name)
- Shipping address
- Event properties
- Tracking number
- Order ID
- Link to the tracking page
- Link to the order details
- Status changed from
- Status changed to
How can integrations with Klaviyo/Omnisend/Segment be beneficial for my business?
Such integrations open up the world of opportunities of email marketing, SMS and automation. You can use them to:
Improve customer segmentation
Knowing your customers' shopping behavior will help you personalize the messages, keep them engaged and drive more repeat purchases.
Customize order and shipping confirmation emails
Shipping and order confirmation emails are two transactional emails that don’t always get the attention they deserve. However, with the open rates as high as 85% it’s a perfect opportunity to:
- Cross-sell and upsell without sounding salesy;
- Drive referrals;
- Build customer loyalty;
- Give your customers irresistible offers (discounts, free shipping, featured products);
- Find more tips in our blog post.
Get feedback on the purchased items upon successful delivery
A moment when a person opens his long awaiting order is a perfect one for taking the pulse of your customer. Seize this opportunity to build a broad customer feedback base boosting your brand's credibility.
What if I need this to work with Hyva on Magento?
To connect extensions with the Hyvä theme, install the Hyvä compatibility module. The Hyva compatibility module is available for composer installation only. Please use the command below to install the compatibility package:
composer require aheadworks/module-trackr-hyva
This particular package does not require login and password and is accessibile for installation to any user.